
Roofing - fixing battens.
Safety: Working on a roof involves working at height , so always use scaffolding or other stable platform, never use just ladders (even on a bungalow).
the basics - spacing - fixing
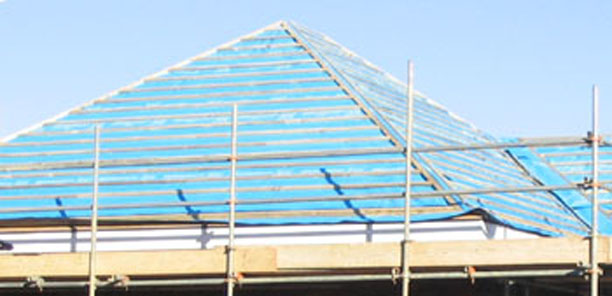
With the roofing felt fitted (see fixing roofing felt), the next job is to fix the roofing battens.
The basics
 The slate or tile manufacturer or supplier will specify the size of battens to be used, typically this would be 40 x 20mm (1.5 x ¾ inch), but where the horizontal gaps between rafters is large or the slates/tiles are heavy, then bigger battens may be needed.
Battens should always be tanalised timber to protect them - most builders merchants will carry tanalised roofing battens as a standard product line.
Spacing the battens
The next thing to do is to work out the spacing for the battens up the roof.
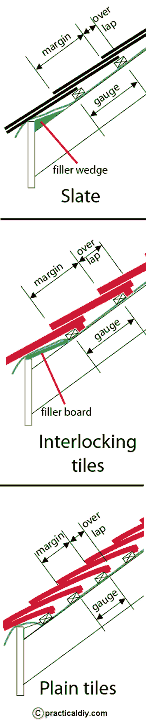
The slate or tile manufacturer or supplier will specify the spacing of the battens up the roof for the particular type of covering (this spacing is referred to as the 'gauge'), the gauge may depend upon the pitch of the roof and the amount of exposure. When using reclaimed slates or tiles, the gauge will need to be taken by reference to the literature of similar products or worked out.
The 'gauge' is actually the same as the 'margin', this is the length of the slate or tile exposed to the sky. This will probably be visible on reclaimed items, so their 'gauge'/'margin' can be measured on a reclaimed item.
In some cases, the manufacturer's datasheet will specify the required overlap, typically this will be about 75mm (3 inches). In this case, to determine the 'gauge' and 'margin' will just be the overall length of the slate/tile less the specified overlap - take care when working with slates as a 'head overlap' is sometimes quoted, this is the distance from the fixing holes (halfway down the slate) to the lower end.
The manufacturer may specify a different 'gauge' for different slopes of roof, where there are different slopes on one roof (such as where adjoining roofs having different slopes or where there is a window in the roof), choose the gauge for the lowest angle (which will be the smallest gauge) for all the roof slopes - then, the rows of tile/slate will line up where the slopes meet.
The 'gauge'/'margin' quoted by a manufacturer will be the minimum acceptable, you will need to work out the 'gauge' you actually require for your particular roof so that a full number of 'gauges' span from the bottom batten to the ridge (this will avoid ending up with a part tile at the ridge if you use the specified spacing).
- Start by establishing the position for the lowest batten for the slates/tiles on the roof - allow for the overhang of the stales/tiles in front of the fascia.
- Then determine the position of the highest batten at the top - typically, the top of the uppermost row of slates/tiles should be at least 75mm (3 inches) under the edge of the ridge tile.
- Measure between the top of the top batten and the top of the lower batten and this divide this measurement by the manufacture's 'gauge' - this will give the number of slates/tiles rows need to cover the roof.
- This number is very unlikely to be a whole number, so round the number up to the next whole number.
- Finally, divide the measured distance between the battens by the rounded number - you now have the 'gauge' that your roof requires.
Example:
- Measurement between battens = 3.2m,
- Manufacturers 'gauge' = 260mm, so total recommended 'gauges' required = 12.31.
- Rounded up this becomes 13 - then divide this into the original measurement = 246.15mm.
Note that this is a rough guide only - but it does illustrate that by using the manufacturer's 'gauge', you could end up with an awkward part tile at the top of the roof.
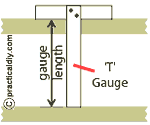 Once you have the length for the 'gauge' for your roof, make up a 'T' Gauge from a couple of pieces of timber to use when setting the battens to get consistent spacings.
Fixing the battens
Begin by positioning the lowest batten so that the slates/tiles will overhang the fascia board - set the distance on the rafters at both ends of the roof and run a string line between, check along the string line to make sure that the distance is fairly consistent and satisfactory (fascia boards may sometimes wonder a little bit - this can be checked by eye by looking from one end along the front face). Pay special attention to setting out the lowest batten, all the other battens will be set to it.
Cut the first batten to length, if more than one length of batten will be required to cover the full roof length, measure and cut the batten so that it ends half way across a rafter where the next batten will abut the end.
Using the string line as a guide, nail the lowest batten in place, use galvanised wire nails (60 mm ( 2½ inch) are usually adequate) to secure the batten to each rafter - ideally the nails should penetrate the rafter timber by at least 40mm.
- At verges, take the battens to about 25mm (1 inch) from the end of the underfelt.
- At hips, end the batten from each side so that a batten can be fixed along the top of the hip board.
Once the lowest batten is in place, use the 'T' Gauge as a spacer to position the next batten, again measure the length and cut before nailing. If more than one length of batten is required for the roof length, do not have the joints in adjacent batten runs on the same rafter, stagger them.
Repeat this sequence for the rest of the battens up to the top of the roof slope.
If any of the overlaps along the felt not coincide with a batten, add another batten just to hold down the overlap - if using tiles, take care to ensure that this addition batten will not interfere with the tile nib.
You might find there is a need to slightly deviate from using the 'T' Gauge for the topmost batten (any minor errors is setting out the the other battens or cutting the original gauge, will add up over the slope of the roof); so, adjust the topmost batten as necessary to suit the ridge tile.