
Installing or replacing a cold water tank
Modern cold water tanks are usually made of plastic and this article deals will installing one either as a complete new installation or as a replacement for an old galvanized or asbestos tank.
The old tank in the roof space
The old galvanized and asbestos tanks can usually be left in the roof space as they are heavy and awkward to move, often they were fitted during construction and will not fit through the loft hatch.
If necessary, old galvanised tanks can be cut up in the loft and the pieces removed.
Old asbestos tanks must not be cut or broken up as the dust created is extremely dangerous; even minute particles can be very hazardous to health.
If an old asbestos tank must be removed from the roof space, it is essential that this is done and the tank disposed of safely, check your local trade directories for professional asbestos removers.
The new tank
A new cold water tank should have a minimum capacity of at least:
- 100 litres (22 gal) if it is to supply only either a cold water system or a hot water system.
or - 200 litres (44 gal), (ideally 250 litres (55 gal)) if it is to serve both the cold and hot water systems.
All new cold water storage tanks must comply with Byelaw 30 which is all about protecting the stored water from contamination; usually all new tanks are clearly marked as complying and come with the required fittings.
Finding a new tank to fit in the roof space
Getting a new cold water tank into the roof space can be a problem if the loft hatch is too small for a new tank to pass through. Possible options to overcome this are:
- Special narrow, long tanks are available (often referred to as coffin tanks – for obvious reasons) are available and these will pass through fairly small openings.
- If a round tank is used, the sides of it can often be folded in sufficiently for it to pass through the opening.
- When all else failures, two smaller tanks can be coupled together to provide the necessary storage volume. With this arrangement (illustrated below), the overflow and hot water vent pipes must be connected to the tank with the float operated valve, and the outlets to the water systems taken from the tank without the valve/overflow. The tanks should be coupled together using at least 22mm pipework.
Fitting the new tank
The new water tank should be installed as shown in the illustration below.
The cold water tank needs to be located as high as possible to obtain the best water pressure at the outlets, (i.e. showers, taps etc); to achieve the best height possible, it may be necessary to construct a supporting framework to lift the tank.
Any such framework must be built sufficiently strong and braced so that it can take the weight of the tank full of water – (1 litre of water weighs 1 kg, so a 250 litre tank will weigh in excess of 250 kg when filled).
A plastic cold water tank must always be mounted on a firm base supporting the complete underside on the tank; if this is not done, the weight of the water within the tank may cause the plastic to stretch, distort and eventually fail. The old galvanized and asbestos tanks were far more rigid and did not need to be fully supported.
The illustration above shows stopcocks and gatevalves fitted to the inlet and outlets of the tank; older installations may not have these but when fitting a replacement tank, they should be added if necessary – it will make life much easier when you need to work on another part of the plumbing as the cold tank can be isolated rather than having to be drained down.
An old tank may not have had a filter fitted in the overflow pipe, this is now a requirement of Byelaw 30 and must be added when a new cold water tank is fitted, it usually comes with the fittings supplied with the new tank.
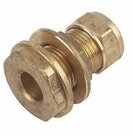 The pipe connections to the tank are made using tank couplers (shown right), these are fittings with a compression joint at one end of an external threaded body with a large boss at the other end; a nut and typically 2 plastic washers fit the threaded body between the compression joint nut and the boss. The compression joint nut, and main nut and a washer are first removed and then the threaded body is passed through a hole made in the wall of the tank from the inside and the nut/washer fitted; as the boss is held in place within the tank, the nut on the outside is tightened and the fitting is pulled tight to the wall of the tank. When fitting the tank couplers, no jointing compounds should be used as they may have a detrimental effect upon the plastic of the tank and could lead to it breaking down.
Once the tank connectors have been fitted and the tank is in its final position, the pipes can be connected to the compression joint on the outside of the water tank.
Fitting the ballcock is straight forward, however a float valve backing plate (just a large metal plate with a hole) must be fitted to reduce the flexing of the side of the tank; if the plate is not fitted, the flexing of the wall can lead to water-hammer, other noises or possible long term failure of the tank wall.
A word of warning if you use an immersion heater
Some instances have occurred where the immersion heater thermostat in a hot water cylinder has failed in the closed position and has led to the water in the cylinder boiling, venting into a plastic cold water storage tank and softening the plastic resulting in the collapse of the tank.
From April 2004, new and replacement Immersion Heater Thermostats needed to incorporate an overheat safety cut-out so that if the water thermostat fails, the water in the cylinder will not overheat.
If you have an old type thermostat without this overheat safety cut-out fitted to the hot water cylinder (or are not sure), replace it with a modern type before fitting a plastic cold water tank.