
Fitting taps to hand basins, baths and sinks
the parts needed - assembling the tap
This article describes fitting taps with ½ and ¾ inch connection tails (including 2 hole mixer taps) to basins, baths and sinks - see our separate article for fitting Mono block (single hole) mixer taps.
The parts needed
Fitting taps to hand basins, baths or sinks is usually straight forward although it is much easier if they can be fitted to the unit before it is installed - gives makes access to the backnut of the tap much easier.
Before fitting the taps, take a look at them:
- The thread on the tails of some taps may stop some distance from the mounting face.
- Other taps have a square, locating shank below the mounting face (see left illustration above).
Either of these cases may prevent the tap being tightened to the basin/etc if the gap between the mounting face and the start of the thread on the tail is greater than the thickness of the basin/etc as the backnut will tighten onto the body of the tap instead of tightening against the unit. 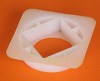 To overcome this problem, such taps need a 'tophat' washer (see below, right) fitted between the backnut and the basin/etc - the backnut then tightens onto the 'tophat' washer which is forced against the basin/etc.
When fitting taps to fibreglass baths or composite sinks, fitting a 'tophat', or a plain, large washer between the backnut and the bath/sink will prevent the backnut cutting into the bath/sink material.
New taps are usually supplied complete with all the backnuts and washers needed for fitting - but without any 'tophat' washers, the appropriate sized 'tophats' need to be purchased separately if required.
Assembling the tap to the unit
- Put the washer supplied over the 'tail' of the tap, on to the mounting face of the tap.
- Insert the tap through the mounting hole in the basin/etc, making sure that it faces the correct direction if the tap has a shank and the unit has a square mounting hole.
- If required, assemble a 'tophat' washer over the tail of the tap ensuring that it sits over any shank projecting from the mounting face of the tap.
- Screw the backnut onto the tail and tighten it by hand onto the unit or 'tophat' washer.
- Make sure that the outlet of the tap is positioned correctly for use and tighten the backnut by just under one full turn using a tap spanner or similar - take care not to overtighten.
NOTE: Accessing and tightening the backnuts when the unit has been installed will almost certainly be harder than if the taps had been fitted before. The shape some basins/etc, will make tightening the backnut awkward even with the unit uninstalled. - If possible (i.e. the length of pipe is known), fitting the length of supply pipe to the bottom of the tap tail before installing will make the rest of the installation easier.