
Fitting an outside tap
Fitting an outside tap to most houses is usually straight forward, the biggest part of the job is probably drilling the hole through the external wall for the pipe.
It is normally easiest to fit the outside tap to a wall outside the kitchen as the mains water usually goes to the cold tap on the sink.
To get an adequate water pressure at the end of a hose, the tap does need to be connected to the water mains not to a tank supplied, gravity feed.
Requirements
The installing needs to comply with certain regulations which specify that:
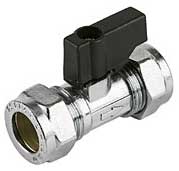 The tap can be isolated by means of an in-line shut off valve, such as a stopcock, or in-line service valve.
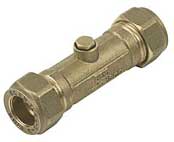 A device must be installed in the pipework to prevent water being drawn back into the household water supply should a negative water pressure be created. The usual device fitted is a double check-valve which basically incorporates two spring loaded non-return valves. Some outside taps themselves incorporate such a valve.
- Provision must be made to drain the water from the pipework in winter months when the tap is not in use.
- Thermal insulation material must be fitted around the external pipework as necessary.
- The pipework/tap must be electrically earthed to ensure that the tap cannot become electrically dangerous.
The style of tap.
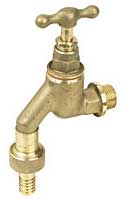
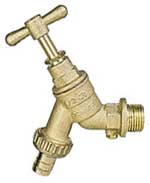
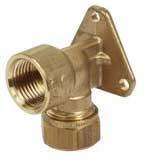
Outside taps come in two styles, a bib tap (shown below, left) has the output directed downwards while a standard outside tap (below, middle) has the outlet at a slight angle – both types can be screwed into a wall mounted elbow (below, right) for the supply and should include a screw-on adaptor to the outlet for a hose pipe connection.
 |
 |
 |
Installing the pipework etc for an outside tap is as follows:
- Decide on the position for the tap outside the house – ideally it needs to be near the internal cold water mains supply to reduce the plumbing required. Usually, the outside wall behind the kitchen sink is ideal, if the tap can be positioned above an open drain gully, so much the better.
- Mark the height for the tap on the outside wall, ensure that it is high enough above ground level for a watering can to be held underneath to fill.
- Inside the building, identify suitable positions (i.e. clearing waste pipes, shelves etc) to take the plumbing through the outside wall and to make a connection to the cold water pipe – ideally it should be directly under the tap position on the outside wall to keep the pipe run simple.
- From the inside, drill a hole through the outside wall at the required position using a long (150mm) masonry drill. Once you have a pilot hole through to the outside, open it up to 22mm using a 22mm masonry drill-bit in a hammer action drill.
- Measure the thickness of the wall and cut a piece of 22mm copper pipe to length so it can be inserted through the wall to be a protective sleeve for the actual water pipe.
- Inside the building:
- Turn off the water supply.
- Cut into the cold water supply pipe (some water will come out, so have a piece of rag to hand).
- Fit a coupling to connect the new pipe.
- Along the new pipe-run to the hole through the wall, fit an inline shut off valve, then a double check-valve (if not incorporated in the outside tap) and a drain cock.
- Run the pipe through the wall (inside the sleeve) and route it to a back-plate elbow, secure the elbow to the wall using wallplugs and screws after the pipe work has been cut to length and the couplings (except for the pipe to the elbow joint) tightened.
- Screw the outside tap into the back-plate elbow using some plumber’s compound on the thread .
- Before turning the water supply back on, check the tightness of all the compression joints, close the drain cock, the outside tap and the inline shut off valve.
- Turn the water supply back on and check for leaks. Open the inline shut off valve and check for leaks. Open the outside tap and check the flow of water. Close the outside tap and check for leaks.
- Apply some mastic sealant to the gap between the 15mm pipe and the 22mm sleeving, and between the sleeving and the masonry.
- Finally, fit some insulation material around the pipework to protect it from winter frost.