
Slide valve - replacing washer
dismantling the valve - changing the washer - reassembling the valve
An overflowing water cistern or tank is usually caused by a worn washer in the slide valve, the leaking washer will probably result in water just dripping continuously into the tank but it will eventually raise the water level to the overflow pipe.
This 'drip by drip leakage' will take some time to raise the water level sufficient; normal day to day usage of water from the tank may hide the problem. The problem may not become evident until this daily pattern is broken, such as after a property has been empty with everyone away on holiday.
The first thing to check when water is seen dripping out of the overflow from a lavatory cistern or other tank after a period of time, is the slide valve in the cistern/tank.
NOTE: These notes should be read all the way through before starting to replace a washer in a slide valve. If the washer end-cap on a brass slider (see here below) is found to be seized, this would prevent completing the job - meaning the tank and water supply from it would be out of commission until a replacement was purchased. To avoid any delay in reconnecting the water to the tank, it is worth considering buying a replacement nylon slider before starting the work - valve sliders used in the UK are usually a standard diameter of nearly 16mm (about 5/8th inch).
The water supply to the tank/cistern must be turned off before starting work. The tank does not need to be drained completely but some water will need to be drained off to take the pressure off of the float otherwise it will be difficult to remove (and replace) the arm in the end of the valve.
Although the illustrations below show the complete valve removed from the tank, the job can be done satisfactorily with it still attached to the tank.
Dismantling the valve
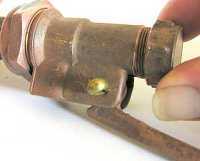 Start by taking the end cap off of the body of the valve - the cap may be tight and require the use of a set of silsons or a large pair of grips.
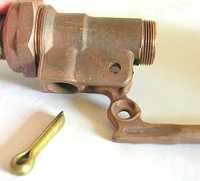 Use a pair of pliers to lose up the ends of the split pin forming the pivot and holding the float arm in place. Withdrawn the pin through the holes in the valve body and remove the float arm.
 Remove the slide valve from the end of the valve body. It may be necessary to use a small screwdriver through the opening underneath the valve body (where the float arm was located) to push the slider out sufficiently for it to be griped by the fingertips and then withdrawn. One end of the slider holds the washer to be changed.
Changing the washer
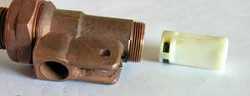
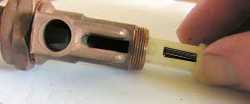
The slider may be either of two types commonly fitted, solid brass with a screw cap holding the washer or nylon (as shown here) where the washer is just pushed into a groove. Whether the slider is brass or Nylon largely depends on the age of the ball valve (older ones used solid brass, more modern ones used Nylon) - each type of slider is interchangeable.
- On a brass slider, the end washer cap needs to be unscrewed to release the old washer replaced and a new washer fitted before replacing the end cap. A common problem with brass sliders is that the slide valves will probably have been operating for many years and the end washer cap usually becomes seized on the body of the slider. The end cap may be loosened by gripping it with a pair of pliers and inserting a screwdriver in the slot in the body to get some purchase.
However, if the end washer cap cannot be removed from slider body, the easiest thing to do is to fit a new replacement Nylon slider. -
 On a nylon slider there are normally slots around the end of it where the edges of the washer are exposed (these slots are obvious in the above illustration, at the left end of the slider.
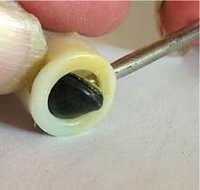
Use a small screwdriver through one of the slots to force the old washer out (see right).
Once the old washer has been removed, clean any muck out of the locating groove and push the new washer into the locating groove making sure that it fits squarely against the end of the main body.
Reassembling the valve.
Reassembling of the slider into the valve body is simply the reversal of the dismantling procedure, points to note are:
 Ensure sure that the washer end of the slider goes into the valve body first and that the slot in the side of the slider is in line with the slot in the valve body where the end of the float arm goes.
- Locating the float arm in the valve body can be tricky as the end needs to locate in the slot in the slider - if problems are encountered, it could be either:
- The slider has rotated in the body of the valve so that its slot is not lining up with the slot in the body of the valve.
- The slider is either too far in the valve body, or not far enough in.
- Once the float arm has been positioned in the slider and the pivot split pin fitted, slightly open the ends of the split pin to prevent it coming out.
- The end cap, over the end of the slider, only needs to be 'nipped-up', it does not need to be over-tight.