
Working with Plasterboard - the corner joints
external corners - internal corners
Corner strip for plasterboard is available in rolls and is made up of two metal strips attached to a tough paper backing.
The strip is first cut to length using heavy duty scissors, and then bent so that the paper will be towards the plasterboard for either external or internal corners.
Two tools are required:
- A set of jointing knives - 150, 200mm and 300mm (6, 8 and 12 inch).
and - A soft sponge.
The materials required are:
- Plaster jointing filler - powder form is better as premixed tends to give a thicker coating which is undesirable for corner finishing.
and - Plasterboard corner strip - normally available in rolls - this is NOT the same as the metal corners used in conventional plastering.
If wall to ceiling corners are going to be finished in this way (rather than using coving), cut the ends of the corner strips back 45° so that the vertical and horizontal strips meet without overlapping. Put all vertical and horizontal strips in place before proceeding with finishing any corners.
External corners.
 Apply
a thin coat of plasterboard filler to each side of the corner to a width just greater that the paper backing to provide a bedding for the corner strip.
Apply
a thin coat of plasterboard filler to each side of the corner to a width just greater that the paper backing to provide a bedding for the corner strip.
Lightly position the corner strip onto the filler and lightly press the strip into it on both sides of the corner, apply any pressure away from the corner line so that the backing paper is pulled away from the corner. Pay special attention to the edges of the backing paper, they needs to be as tight to the plasterboard as possible (i.e. with as little filler as possible underneath). Remove any surplus filler and allow to dry.
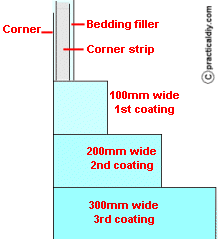
Use a 150mm jointing knife to apply the first coat of filler, spread the filler only about 100mm from the corner on both sides (this needs to cover the edge of the backing paper of the corner strip), make sure that there is filler at the actual corner. Keep the coating as thin as possible whilst covering both the metal and paper backing of the corner strip. Run the knife along the line of the corner to take off any sharp edge (the corner should be slightly rounded rather that a sharp pointed edge).
When this coating has dried, scrap it to remove any high spots.
Apply another coat of filler in the same manner but this time using the 200mm jointing knife and go about 200mm from the corner on both sides.
When this coating has dried, scrap it to remove any high spots.
Apply another coat of filler in the same manner but this time using the 300mm jointing knife and going about 300mm from the corner on both sides.
When this coating has dried, lightly rub the finish using a fine sandpaper (220 grit or finer).
When this coating has set, apply another thin coat of filler and then using a damp sponge working in a light, circular motion, feather the edges of the filler onto the front face of the plasterboard - keep washing out the sponge and wringing it to dampness to avoid a build up of filler in it. You may need to repeat this after you have allowed the filler to dry - some people use a fine abrasive paper to get the last marks off, but be carefully not to abrade the front paper of the plasterboard.
Internal corners
This is very much like finishing external corners.
Apply a thin coat of plasterboard filler to each side of the corner to a width just greater that the paper backing.
Lightly position the corner strip onto the filler and lightly press the strip into it on both sides of the corner, care needs to be taken that the metal strips and hard against the plasterboard whilst the backing paper is not creased in the corner - adjusting one metal strip to remove a crease can pull the other strip away from the wall. Pay special attention to the edges of the backing paper, they needs to be as tight to the plasterboard as possible (i.e. with as little filler as possible underneath). Remove any surplus filler and allow to dry.
Use a 150mm jointing knife to apply the first coat of filler, spread the filler only about 100mm from the corner on both sides (this needs to cover the edge of the backing paper of the corner strip), make sure that there is filler in the actual corner. Keep the coating as thin as possible whilst covering both the metal and paper backing of the corner strip.
When this coating has dried, scrap it to remove any high spots.
Apply another coat of filler in the same manner but this time using the 200mm jointing knife and go about 200mm from the corner on both sides.
When this coating has dried, scrap it to remove any high spots.
Apply another coat of filler in the same manner but this time using the 300mm jointing knife and going about 300mm from the corner on both sides.
When this coating has dried, lightly rub the finish using a fine sandpaper (220 grit or finer).
When this coating has set, apply another thin coat of filler and then using a damp sponge working in a light, circular motion, feather the edges of the filler onto the front face of the plasterboard - keep washing out the sponge and wringing it to dampness to avoid a build up of filler in it. You may need to repeat this after you have allowed the filler to dry - some people use a fine abrasive paper to get the last marks off, but be carefully not to abrade the front paper of the plasterboard.