
Repairing small holes in
plasterboard walls
Assess the damage
The method of repair depends upon the degree of damage, the first thing to look at is the thick paper on the back of the plasterboard to see if the damage is restricted to just the front surface and plaster core or if it goes all the way through the plasterboard.
Dealing with the repair
If the damage is restricted to just the front surface and the core, the backing paper of the plasterboard will still be intact:-
- Use a sharp craft knife to cut away any plaster skim and the front paper of the plasterboard to expose the plaster core - remove all the broken and damaged plaster from the core.
Clean out the hole using a small, dry brush. - Mix up some plaster filler and, when it is ready to use, use a small brush or water spray to dampen the inside (back and sides) of the hole - but don't over soak the plasterboard.
- Fill the hole with plaster filler using a filling knife so that it is slightly above the surrounding wall surface, make sure that the filler is pushed well into the edges of the hole.
- Using a wet filling knife level off the filler to the surrounding surface - if the hole is too wide for the filler knife, run the knife around the edges and then across the middle of the repair.
- The filler may shrink as it hardens, so the repair may need to be recovered with plaster filler and releveled. Before applying additional layers, lightly sand the repair and surrounding plaster and moisten the surface.
If the damage to the plasterboard goes right through the plasterboard:-
- Use a sharp craft knife to cut out the damaged area of plasterboard after checking for any electrical cables behind the plasterboard, don't worry too much about pipework behind the plasterboard as they won't be damaged by using a knife.
 Cut
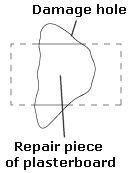
a new piece of plasterboard to bridge the damaged area from an off-cut; it needs to be narrow enough so that it will pass, sideways, through the hole in the plasterboard but wide enough in the other dimension that it will rest against the back of plasterboard.
Cut
a new piece of plasterboard to bridge the damaged area from an off-cut; it needs to be narrow enough so that it will pass, sideways, through the hole in the plasterboard but wide enough in the other dimension that it will rest against the back of plasterboard.
Look at the diagram to the right to get an understanding of the intention.
 Drill a hole in the middle of the repair piece of plasterboard and thread a length of string through it, tie the string on the back of the repair piece so that it cannot be pulled back through. If necessary tie the string around a matchstick (or similar) to stop it pulling through.
- Mix up some plaster filler and, when it is ready to use, use a small brush or water spray to dampen the sides of the hole - but don't over soak the plasterboard.
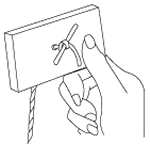
 Hold the string and slide the repair piece sideways through the hole into the void
behind the plasterboard.
Hold the string and slide the repair piece sideways through the hole into the void
behind the plasterboard.
Use a filling knife to apply a dab of plaster filler to the back of the surrounding plasterboard; then align the repair piece and pull it into the filler and against the back of the plasterboard.
Whilst holding the repair piece in place by the string, use a filler knife to apply filler between the edges of the hole and the repair piece, but keep the filler away from the string and below the level of the front face.- Allow the filler to hardened and then cut the string and push it carefully back through the repair piece.
- Dampen the filler already applied and apply more plaster filler to fill the hole.
- The hole will probably need a number layers of plaster filler to fill it completely, but once the level of filler reaches the surrounding surface, use a wet filling knife to level off the filler to the surrounding surface - if the hole is too wide for the filler knife, run the knife around the edges and then across the middle of the repair.
- The filler may shrink as it hardens, so the repair may need to be recovered with plaster filler and releveled. Before applying additional layers, lightly sand the repair and surrounding plaster and moisten the surface.