
Lath & plaster and Plasterboard ceilings explained
The two of plaster surfaces commonly encountered:
- Lath and plaster - generally used up to the mid-1950's.
- Plasterboard - widely used from the 1950's onwards.
In older house, lath and plaster ceilings may be countered, this technique was largely replaced by plasterboard in the 1950's.
When a ceiling required repair, it is important to understand the differences between the two types and know which method was used when the ceiling was erected.
Any repair will need to be carried out using the same techniques and materials as the original.
Traditional lime putty used in lath and plaster ceilings is softer than modern gypsum plasters, and the two don't work well together.
Lath and plaster
 Ceilings were usually made using the lath and plaster attached to wooden joists from the early eighteenth century to the mid 1950's.
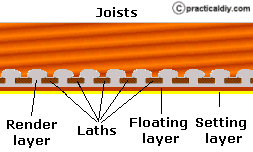
A cross section of a lath and plaster ceiling is shown to the right.
The laths are thin strips of wood (typically about 25mm by 6mm (1 by 1/4 inch) nailed to the underside of the timber joists with a gap of about 6mm (1/4 inch) between each lath.
The plaster was traditionally applied to the laths in three lime putty layers:
- The first layer (aka the render layer) was forced into the gaps between the laths to obtain a strong bond to the laths, this layer was typically about 6mm (1/4 inch) thick.
- The second layer (aka the floating coating) to be applied provided the relatively smooth finish for the third layer, this layer was typically about 6mm (1/4 inch) thick.
- The third and final layer (aka the setting layer) provided smooth finish suitable for decoration (typically the finish was whitewash or distemper), this layer was typically about 3mm (1/8 inch) thick.
The lime mixture of the first and second layers a typically 1:3 lime putty to clean, sharp sand; animal hair was often added to the mixture to help it bind together. The mixture for the setting layer was either a 3:1 lime putty to fine sand mixture (note. not SHARP sand) or just lime putty.
These mixtures changed towards the late 1800's with gypsum or cement being added, this practice increased the setting time so decreasing delay between the application of each layer. Such mixtures were typically 1:1:6 (gypsum/cement:lime putty:sharp sand) for the render and float coatings and equal parts gypsum and lime putty for the setting layer.
Installing lath and plaster ceilings required skilled workers and was time consuming; they were largely replaced by the use of pre-manufactured plasterboard when it became widely available in the middle of the twentieth century.
Plasterboard ceilings
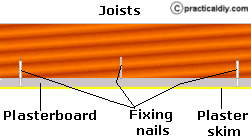 Using manufactured plasterboard for lining ceilings largely replaced the use of lath and plaster in the middle of the twentieth century. A cross section of a plasterboard ceiling is shown to the right.
Lining a ceiling with plasterboard is far quicker, and requires less skill, than using lath and plaster techniques. The plasterboard is simply cut to size, lifted into place against the underside of the ceiling joists and nailed in place.
When plasterboard was first introduced, the sheets were often just butted together and the whole ceiling finished off with a skim of plaster - this, however, often led to the plaster skim cracking along the lines of the edges of the plasterboard as the joists flexed. To prevent these cracking, the practice was changed with the introduction of 'scrim' (a fairly narrow (50mm (2 inches)) fine, flexible over-weave jute fabric or plastic tape) being applied over the joins prior to the plaster skim being applied; this gave the plaster more strength and usually prevented the plaster from cracking along the join s between the pieces of plasterboard.
Modern (21st century) practice is for the plasterboard to be screwed to the joists (rather than nailed) and the joins seal with scrim, the whole ceiling being finished using a textured or plain flexible paint.
See also: Repairing large holes in plasterboard stud walling and ceilings