
Removing an old fire surround
When it comes to renovating an old property, one of the first things which may need to be considered is whether to keep old open fireplaces – with modern central heating systems, an open fireplace can just be an escape route for heated air.
Before you start to remove the fire surround or hearth it’s worth asking yourself if they have a resale value – cast iron and old timber surrounds can have a value which makes their careful removal worthwhile - brick and tile surrounds dating from the 1940’s don’t usually have a resale value.
If in doubt, ask an expert – once you've damaged or broken up the surround, it will have little or no value.
Removing an old fireplace involves three main steps - removing the surround (which may be one of several types), removing a raised hearth if there is one, and sealing up the fireplace opening (unless a new hearth/fire surround is going to be fitted).
Below we cover removing:
- A cast iron fire surround.
- A tiled fire surround.
- A timber fire surround.
- A brick or stone fire surround.
- A hearth, which may have been fitted with any of the above.
Once a fire surround has been removed, the opening can be bricked up, or boarded up over a timber frame built across the front of the opening. Before the opening is closed up, the chimney should be swept and the top of the chimney capped by a builder.
A cast-iron fire surround
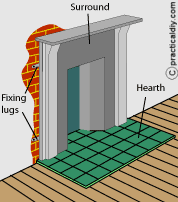
- A cast-iron fire surround is usually fixed to the wall by screws through metal lugs near the top on each side, often there are also lugs towards the bottom; these will be hidden by the wall plaster. After removing any wall covering, carefully chip away the plaster all around the surround to expose the fixings and also give clearance when the surround is removed.
- Cast-iron fire surrounds are often top heavy so before starting to remove the fixings, wedge a length of timber between the top of the surround and the floor to prevent it fall when the fixings are released.
- Clear the slots in the fixing screws of plaster and if possible remove them. If the fixings cannot be removed, try to carefully prise the lugs away from the wall, be very careful when attempting this as cast-iron is very brittle and can easily break – such damage will lower the value of the surround if you intend to sell it.
- The grate (the centre piece going back into the fireplace) may be fixed to the surround with screws or bolts, but there is no need to separate them as the surround and grate will come out together.
- Once the fixings have been removed, take the weight of the surround, remove the piece of wood supporting the surround and pulling the surround forward, lower on to the floor.
If you want to separate the grate from the fire surround, the fixing screws/bolts will probably be seized solid and will probably need to be soaked penetrating oil before they can be loosened, this may take several applications of oil over a 24 hours period.
If the screws/bolts can still not be loosened, they may be removed by either using a nut splitter (which can be hired) or drilled out using a high-speed-steel twist of less than the diameter of the screw shank.
A tiled file surround
A tiled fire surround usually has a concrete backing to which the tiles are fixed and is screwed to the chimney breast through metal lugs, in the same manner as a cast-iron surround. The concrete means that the surround will be very heavy, and it is best to have someone else available to hold it steady and help move it away.
Where a raised tile hearth is fitted, this will either be resting against the front of the surround, or the surround may rest on the back of hearth. If the hearth rests against the front of the surround, it needs to be removed first (see below).
- A tiled fire surround is usually fixed to the wall by screws through metal lugs near the top on each side, often there are also lugs towards the bottom; these will be hidden by the wall plaster. After removing any wall covering, carefully chip away the plaster all around the surround to expose the fixings and also give clearance when the surround is removed.
- Clear the slots in the fixing screws of plaster and if possible remove them. If the fixings cannot be removed, try to prise the lugs away from the wall.
- As the fixings are removed, get someone to steady the surround to prevent if falling.
- Once the fixings have been removed, lower the surround with the aid of your helper. If possible, move the surround outside for breaking up.
- To break up the surround, lay it face down on a firm base and cover it with sacking, or an old curtain. Wearing protective gloves and safety spectacles, use a sledgehammer to break it up into smaller pieces – there may be some metal strengthening within the concrete which you would need to release by breaking the concrete to release them.
A timber fire surround
Modern timber fire surrounds are often secured to the chimney breast using lugs on the side hidden behind the plaster. Old timber fire surrounds were often screwed to wooden battens fixed to the chimney breast.
There may be a tiled inner surround which has to be removed separately or a non-inflammable inner surround attached between the sides of the outer surround.
- Look over the surface of the timber to locate the screw heads, they may be covered with filler or possible hidden behind a decorative moulding. If the position of the screws is not obvious, assume that side lugs are used and chip away the plaster down one side of the surround; if this reveals a lug, carry on chipping away the plaster from around the surround and remove the surround as outlined for cast-iron fire surrounds above.
- If no lugs are revealed, it suggests that the surround is secured to battens on the wall. If the surround has been painted or varnished, this will probably need to stripped off before you have a chance to locate the screw positions.
- Carefully remove the filler and clean the screw slots, and undo the screws.
- Lift the surround away and remove the battens from the wall.
- Remove any inner tiled surround, it is usually fairly light and can be moved by one person.
A brick or stone fire surround
Start by checking that the fire surround is made from real brick or stone and not just thin brick or stone facings attached to a concrete backing. If it is just brick or stone facing, removal in the same as for a tiled surround above.
A real brick or stone fire surround needs to be removed brick by brick (or stone by stone).
Wearing protective gloves and safety spectacles, use a hammer and cold chisel to chip away the mortar to loosen each brick/stone starting at the end of the top course, work your way along and down.
There may be metal ties or nails in the mortar joints and attached to the chimney breast. To remove these, chip away the wall to free them.
Removing a tiled, brick or stone hearth
A hearth may consist of a tiled slab of concrete or a number of stone or bricks. The raised hearth is bonded using mortar to a concrete slab (known as the constructional hearth) flush with the floor and projecting into the room.
Often the mortar used under a tiled concrete hearth will be fairly weak as the weight of it alone will hold it in place. Use a hammer and cold chisel to make a hole in the mortar so that a crowbar can be inserted to lift the hearth – once the mortar bond is broken, it will need a couple of people to carry it outside where it can be broken up in the same manner as a tiled fire surround.
Where individual tiles, bricks or stone are bonded directly to the constructional hearth, wear protective gloves and goggles and use a hammer and cold chisel to chip away the mortar to loosen each individual tile, brick or stone; or chip away sufficient mortar so that they can be individual prised off.
The constructional hearth should be left in place and self-leveling compound used if necessary to smooth the top before any floor covering is laid.