Using a paint roller
Paint can be applied easily and quickly to large flat areas (such as walls and ceilings) using a paint roller.
The frame and sleeves
Various sizes of rollers are available (e.g. 4, 9, 12 inch); the roller frame is separate from the actual roller so that the roller can be replaced when it becomes worn or a different type of finish is required. The choice of rollers include:
- Lambswool or sheepskin rollers have a long pile and this makes them ideal for applying paint to uneven surfaces, such as heavy embossed wallpapers. These paint rollers are not suitable for obtaining a smooth finish on a smooth surface. They can be used to apply emulsion or oil based paints.
- Foam rollers (the cheapest) will give a smooth finish but tend to cause splashes if used too fast and do not hold the paint too well - if they become overloaded, paint the will drip off the ends. They can be used to apply both emulsion or oil based paints.
- Mohair rollers have a fine, short and strong pile which holds the paint well and can be used to apply paint to smooth or slightly textured surfaces. They can be used to apply both emulsion or oil based paints.
'Mini' paint rollers are available to paint narrow and awkward areas, such as behind radiators or cisterns, these are smaller in both length and diameter and some have long handle so they can reach into awkward areas.
Painting - the basics
When painting walls, a step-up will usually be needed to cut-in the paint at the top edge with ease. The steps used should be high enough so that you don't need to overstretch. Once the cutting-in has been done, the roller can be used either again using the steps or with an extension to the handle.
When painting ceilings, a step-up will be needed to cut-in the edges. To use the roller, either work from a strong,stable platform or use a handle extension with the roller working from the floor. A suitable platform can be made by using two pairs of steps with a scaffold board between. Work parallel to the windows and paint a strip about 1m wide, then move the platform to the next strip, but take care not to overstretch.
Cutting-in the edges
 'Cutting- in' is using a paint brush to paint the edges of a wall/ceiling where the roller won't reach - this includes areas around electrical fitments, along the top of the skirting boards, and around the windows and door frames etc.
Use a 1 or 2 inch paint brush to produce a sharp line at the edge of the area to be painted in one colour i.e. if the colour is to continue around a corner there's no need to produce a sharp edge, just to paint the area where the roller won't reach.
 An area about 50mm (2 inches) wide needs to be painted in corners and along edges where the roller won't reach - make the cutting-in area a bit wider at the bottom of vertical door architrave where it meets the skirting board, and where a wall corner meets the ceiling (or skirting boards at the bottom) - these are awkward areas for a roller to reach.
Achieve a sharp edge to the paint by first applying the loaded paint brush short distance from the required edge, then spread the paint out using the brush and carefully work the paint up to the edge.
Do the 'cut-in' painting immediately before you are going to paint the rest of the area; if these areas of paint fully dry before the rest of the surface is painted, the 'cut-in' areas will show up when the whole area has been painted.
Painting with a paint roller
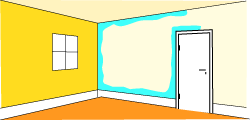
Once the edges have been 'cut in', the remainder of the surfaces can be painted with a paint roller.
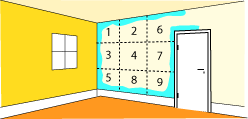
 Before you start painting the surface, imagine the area divided up into squares about 1 metre square; each square needs to be completed with the roller before moving onto the next one. Start painting a wall in a 'square' at the top corner nearest to the window, with a ceiling, start in a corner nearest the window - starting with areas will enable you to use the natural lighting from the window to check the paint coverage.
Start by thoroughly stirring the paint if required (check the manufacturer's instructions) and then pour paint into a clean roller tray to half fill the sunken well at one end.
For water based paint, dampen the roller sleeve with water before you put paint onto it - remove excess moisture by rolling the roller over some clean and absorbent paper (not newspaper, the roller will become contaminated with the ink).
Load the roller with paint by dipping it in the paint in the sunken well of the roller tray and then roll the roller up and down the grid in the bottom of the tray to spread the paint evenly onto the roller then lift the roller out of the tray - if paint drips off the roller when it is lifted, there is too much paint on it, run the roller up and down the bottom of the tray again to remove the excess paint.
Take the loaded roller and starting at the middle of the square, move the roller over the surface without lifting it off the surface in a rough 'M' pattern - starting at the bottom of one side.
Having completed the first 'M', lift the roller off of the surface and do another 'M' pattern across the first, at right angles - this spreads the paint and joins the strokes. Keep repeating this, (reloading the roller with paint if necessary - but don't put too much paint on an area at any one time) reversing the pattern every time, until all the under-surface has been covered.
After the roller has been loaded for the first time, subsequent loading will require less paint as some paint from the previous loading will still be in the roller.
Finally, go over the whole area with the roller moving it in parallel, individual strokes in a single direction - top to bottom on walls, across the room parallel to the window on ceilings. Overlap the paint from the roller onto the brushed cut-in paint area.
Paint the next 'square' using the roller, starting in the middle and spreading the paint using the same 'M' pattern and work the paint onto the previously area to blend the edges.
TIPS
- When you need to stop painting for more than just a few minutes, roll out most of the paint and then wrap the roller in a plastic bag - this will prevent a skin forming on the paint on the roller.
- When you finish with the roller 'for the day', dismantle and clean the roller frame and sleeve - the frame and sleeve will separate to make cleaning relatively easy. Be guided by the paint manufacturer's 'cleaning up' procedure.
- To clean the sleeve - squeeze out as much paint as you can and then rinse it in cleaning liquid, repeat rinsing and squeezing the sleeve until the cleaning liquid is clear.
- The frame can usually be cleaned using a cloth dipped in the cleaning liquid.
- When using any type of paint other than water-based, never leave a paint loaded roller or any rags or brushes in an enclosed area - some non-water based paints can combust. Always place them in a bucket of water or out of doors and definitely out of the reach of children and animals.
