
Sanding wooden floors
A real wooden floor will often be covered by carpets thus hidden the rich quality of the wood. By sanding and then staining or polishing the floor, the whole room can transformed into an expensive-looking and attractive area.
Before sanding
Begin by removing all the furniture from the room and remove all the curtains etc - everything left in the room whilst sanding will be covered in fine dust.
Remove all floor coverings.
Now you can stand back and look at the whole floor and decide if it is going to be worth the effort of sanding it.
Look for:
- Wide gaps between adjacent floorboards or between the floorboards around the edge of the room and the skirting board;
- Split floorboards - boards often split where nails have been put in near the ends or edges of floorboards;
- A variety of fixings holding the boards down, i.e. some floorboards may be nailed down while others are screwed down;
any or all of these points can detract from an exposed floor or might require a lot of work to rectify.
If the floorboards are generally in reasonable condition and you finally decide it's worth sanding, sweep the floor to remove all loose debris.
Check for loose floorboards and secure any found using new nails though fresh timber - drive the nail heads below the level of the floorboard.
Any part of the floorboards which need to be replaced should be cut off over a joist and a new section fitted - it makes the job easier if the same size and type of timber as the original boards can be used; using the same size means the new sections will fit in easier and, using the same type of timber will help the final finish to be uniform over the whole floor.
Check the surface of the floor for any old carpet tacks etc and, ideally, remove them without damaging the timber around them or, if it is not possible to remove them, remove the tack heads using pliers and drive the tack shaft into the floorboard.
Any serious paint on the surface should be removed - use either a chemical paint stripper (preferred) or a heat gun (there is a risk that this will cause the paint to be drawn further into the board).
Work your way over the complete floor using a hammer and nail punch to drive down the nail heads so they are at least 3mm (1/8th inch) below the top of the boards. Be careful to ensure that all nails are adequately driven down as any protruding nail heads will catch the sanding paper and may damage the sanding machine.
If the floorboards have been finished with oil, wax or polishes, that finish needs to be removed (see our article) before sanding - if left, it may clog the abrasive of the sander.
Sanding in general
 A very small floor area could be sanded using a handheld rotary sander together with a handheld sanding block to finish off the corners which cannot be reached by the sander.
When dealing with larger floor areas, it is better to use a belt (or drum) floor sander (illustrated right) for the main area of the floor and then using a handheld rotary sander to sand the areas around the edges and corners where the belt sander cannot reach. You will still need a handheld sanding block to finish off final areas where neither sander can cover.
Sanding a floor always produces a lot of dust, so always wear goggles and a face mask to avoid inhaling the dust. Sanders can also be noisy, so ear defenders should also be worn.
The state of the floorboards will determine how much sanding will be required:
- If the floorboards are fairly level and clean, just sanding along the lengths of the floorboards may be required.
- Where the floorboards are extremely rough, warped or marked, the boards will need to be sanded diagonally and then sanded along their length.
The state of the floorboards will also determine the grade of abrasive first used on the floor, but always use a fine grade abrasive (120 grit size) to finish with. Normally three grades of abrasive will be sufficient - if the first abrasive used is 40 or 60, then follow this with 80 or 100 abrasive and finish with a 120 abrasive.
Before doing any sanding with a machine, ventilate the room by open the windows and seal around the door (to prevent the dust from getting into the rest of the property); always wear old clothes, goggles, a face mask, ear defenders and clean soft soled shoes.
When using a belt or drum sander, always tilt the machine before starting it so that the abrasive face is out of contact with the floor and, when you come to the end of a run, again tilt the machine to lift the abrasive. Never allow the sander to run with the abrasive in contact with the floorboards without it moving, this will cause uneven sanding.
Sanding diagonally
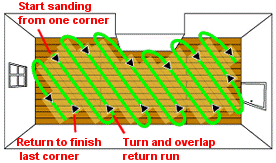 Sanding the floorboards diagonally is definitely required where adjacent boards are not level.
Fit the sander with an appropriate grade of abrasive (40 or 60 grit size). Starting in one corner of the room, tilt the machine, switch it on and walk it diagonally across the floor towards the far wall. Tilt the sander to lift the abrasive just before reaching the far kirting board. Then turn 180 degrees, lower the abrasive and walk the sander back parallel to the first run slightly overlapping on to the first pass. Repeat with further parallel and slightly overlapping passes until reaching the end of the room. Return to the starting corner; an adjacent corner will not have been sanded, sand this using the same procedure as far as you can.
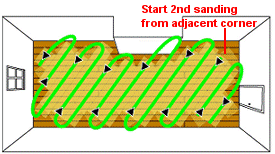 For the second sanding, start from one of the corners adjacent to the first starting corner, repeat the sanding over the whole area of the floor such that the path of the sander crosses over the first sanding at rightangles.
Sanding the areas the belt sander won't reach.
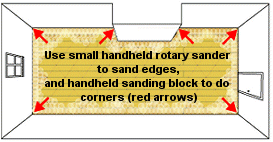 With as much of the floor as possible sanded using the belt/drum sander, now sand the untouched edges of the floor using the smaller, handheld rotary sander - use the same grade of abrasive as was used on the belt sander - this should achieve a consistent smoothness over the floor.
Even the smaller, rotary sander won't be able to sand the floor right into the corners, a hand held sanding block with the appropriate grade abrasive will need to be used to sand these areas.
Sanding along the lengths of the floorboard.
After the floorboards have been sanded diagonally twice (as above) or if the floorboards are in very good condition to start with, use a medium grade abrasive (80 or 100 grit size) to begin with when sanding along the floorboards.
If the floorboards are all flat and have not been sanded diagonally and the floorboards are marked, use a coarse abrasive (40 or 60 grit size) to begin with.
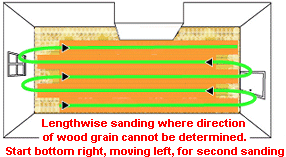 Start in one corner of the room with your back towards one of the short walls; tilt, switch-on and then lower the sander and walk it parallel with one of the long walls. When you reach the end of the wall, tilt and turn the machine and then lower it and walk back parallel with, and slightly overlapping, the first strip sanded.
NOTE: Some guidelines advise "always work with the grain of the timber, not against it" which is all good advice except that individual floorboards won't necessarily have been laid with the grain running in a consistent irection and it is often difficult to see the grain direction anyway! Tongued and grooved floorboards are more likely to be laid with a consistent grain direction than square edged boards.
After the first two room lengths have been sanded (i.e. in opposite directions), compare the finish of the floorboard and see if the direction of wood grain can be established - if one direction of sanding has given an obvious smoother finish, then that is the direction of the grain.
If the direction of the grain is established, sand the rest of the floor 'with the grain' using overlapping strips.
If the direction of the grain cannot be established, sand the rest of the floor by reversing each pass.
Sand into any recess until the whole area of floorboards has been covered.
Use the smaller, handheld rotary sander, and then the handheld block to sand along the edges and into the corners using the appropriate grade of abrasive.
Change the grade of abrasive on the belt sander to a finer grit size and repeat sanding over the floor; if the floor was previously sanded 'with the grain', sand the floor again in the same direction - if the floor was sanded 'up and down', use the same procedure but start the the opposite wall so that each strip is sanded in the opposite direction.
Again use the smaller, handheld rotary sander, and then the handheld block to sand the edges and corners using a finer grade of abrasive.
If necessary, change the abrasive to a finer grit and repeat.
Final touches
Check over the floor for any imperfections, and touch these up using either the hand held rotary sander or the handheld sanding block with a fine abrasive (120 grit).
Tidying up
After the sanding is completed, sweep up the wood dust using a soft broom; then scoop up the wood dust and put it into plastic bags to keep it contained.
When most of the wood dust has been removed, use a hose vacuum cleaner with a soft bristle attachment to collect the remaining dust, pay special attention to the edges and corners where the dust may have collected under the skirting board - as the floor has just been sanded, use a piece of rug or cardboard to stand the vacuum cleaner on to avoid marking the floor.
Your hair and clothes will be very dusty, so give yourself a shake to dislodge as much as possible before leaving the room.
Use a soft broom to sweep the walls, wall fitting, skirting boards, architrave, mantelpiece, window and door frames etc to dislodge any wood dust which has collected. Allow the wood dust to settle for an hour or two and then brush up and/or vacuum the floor again.