
French Polishing
French polish is the application of a solution of shellac dissolved in alcohol. This provides a fast-drying finish which forms a hard film on the timber, although it is not resistant to heat, water or solvents and any of these will cause damage over time, it does provide better protection than just a wax finish.
French polish is a traditional finish for timber with a long history of use usually associated with a high gloss finish. Most modern varnish finishes provide a superior finish which won’t be damaged by heat, water etc, but french polish does represents a tradition finish which no other finish can match.
French polish is available in several colours:
- White polish. Bleached shellac is used to make this white polish, before application it is cream coloured. This opaque, milky appearance is the result of the natural waxes that are found in shellac.
If a number of coats of this white polish are applied, the final finish will appear slightly greyish in colour. The main use of this white French polish is as a sealer to bare timber prior to the application of a wax polish finish. - Transparent polish. This is, in effect, white polish with the natural waxes removed, the resulting french polish has a pale amber colour. This is used where the colour of the timber needs to be retained without an appreciable change; transparent French polish is therefore excellent for mixed species work.
- Garnet polish. This is the darkest of the French polishes being a rich chestnut brown colour. Although this is ideal for applying to dark timber (e.g. mahogany, rose-wood and walnut etc), it is not suitable where the original colour of timber needs to be preserved.
- Button polish. This is another dark French polish although not as dark as Garnet polish. The colour is more honey gold hue than garnet’s chestnut brown. Like the garnet polish, it tends to cover the colour of the original timber but does give an alternative colour finish.
Application of French Polish
French polishing does require some skill although the basics can be picked up fairly quickly – the bigger skills, which takes more practice to acquire, is French polishing small surfaces (i.e. thin table legs rather than the table top).
This article does not cover all the aspects of french polishing, but hopefully gives enough basic information for a novice to start. The skills of french polishing do require practice, patience and attention to detail.
French polish should always be applied in a clean, dust free, warm, and dry environment – this should ensure that the polish can be applied cleanly and will dry quickly and without blemishes. Excess moisture in the environment can lead to a ‘bloom’ appearing in the finish as moisture is absorbed by the polish and becomes trapped.
There are four main stages to french polishing: staining, grain filling, bodying, and spiriting.
Staining
If required, the timber should be stained first using a solvent stain and allowed to fully dry.
Grain filling
When a mirror polish finish is required, the grain of the timber must first be filled to reduce its absorption rate. The simplest method to fill the grain is to use a shellac-based ‘sanding sealers’. A sanding sealer contains a very fine powder which will fill up the grain.
Follow the instructions of the sanding sealer – usually the solution needs to be well stirred before use, so that the fine powder is in solution. The sealer is brushed onto the surface of the timber and into the grain, it is important to avoid a heavy build-up of the sealer on the surface as this will just involve additional work later to remove it. After the sealer has been allowed to dry out, the surface of the timber is then very lightly sanded with a very fine sandpaper to remove any filler about the surface.
Run the tips of your fingers over the surface of the timber to check the smoothness –if you can still feel the grain, apply another coat of sanding sealer and rub down again.
Two applications of sanding sealer should be enough to fill the grain in most types of timber, but if necessary additional layers can be applied and lightly sanded off.
Bodying
Bodying is the process of building up layers of French polish to give a high gloss on a surface which has been sealed by grain filling.
Thin layers of French polish are applied to the timber using, what is known as, a ‘rubber’ which is just a simple, ‘homemade’, pad.
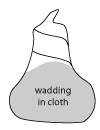 A rubber is just a pad of wadding within a piece of cloth. The qualities of the cloth greatly influence the finish of the polish which can be achieved; for best results, the cloth must be a very fine weave and thin enough to allow a free flow of polish through it – a piece of cotton curtain lining, sheet or handkerchief are ideal.
The wadding is placed in the centre of a square of cloth, then the corners pulled up around the wadding into a pear shape. The shape of the rubber is also important as this will affect its behaviour when applying the French polish – there needs to be a point at the front which will allow the rubber to get into awkward corners etc.
If care is taken, a rubber can last a long time; you will become familiar with how it handles etc, so it’s worth taking care of a good one. When a rubber is not being used, it should be stored in a non-metallic, airtight container. If the cloth becomes clogged or dirty, this will restrict the flow of polish through it, in which case, just replace it with a new piece of cloth. The important things with a rubber are how it fits in the palm of the hand, the amount of polish it will hold, and its springiness.
The french polish is always applied to the wadding within the rubber, not to the outside of the cloth.
A new rubber is loaded with french polish by removing the wadding and dipping it into the polish. Then squeeze out the surplus polish, place the wadding back in the cloth and reform the rubber – the rubber is then ready to use.
The rubber will lose the polish as it is applied to the timber, recharge the rubber by removing the wadding from the cloth and dipping it into some more polish. After replacing it in the cloth, press the face of the rubber against a piece of white paper to squeeze out the surplus polish and redistribute the rest within.
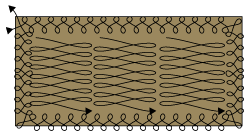
The actual technique of applying french polish varies between people – everyone will find a way which suits them which may vary from how other people apply it. However, the basic technique is to apply a number of very thin layers in such a way that any remaining open grain becomes filled and the polish film is built up to a smooth finish.
For large areas the technique normally requires repeated application of layers applied in three stages:
- small figures of 8,
- large figures of eight,
and
- straight strokes.
Each stage follows on from the previous without allowing the polish to dry out on the timber; it is only after the straight stokes that the polish is allowed to dry enough for the next layer of polish to be applied in its three stages.
For narrow areas the technique normally requires repeated application of layers applied in two stages:
- circular
followed by - straight strokes.
Again each stage follows on from the previous without allowing the polish to dry out on the timber; it is only after the straight stokes that the polish is allowed to dry enough for the next layer of polish to be applied in its two stages.
Small figures of eight
 Begin by using the loaded rubber moving in small figures of eight, first around the edge of the piece and then in the centre working along the grain. The amount of polish left on the timber as the rubber moves across it can be quite critical. The surface should be smooth and obviously wet as the rubber passes over the work, but it should be fast drying, not pools of polish. The rubber must always be kept moving on the surface, if it stops on the work there is a risk that it will stick to it and spoil the surface. Adjust the pressure on the rubber to control the flow of polish, start using little pressure and increase it as the rubber dries; learn when to recharge the rubber rather than increasing the pressure too much.
After covering the work piece with small figures of eight, there will be evidence of small, swirling tracks rather than the desired ultra smooth finish – this is to be expected at this stage.
Large figures of eight
 The small, swirling tracks left by the small figures of eight will be removed by changing the movement of the rubber to larger figures of eight, in the general direction of the grain.
These large figures of eight need to be continually applied until the marks left by the previous application have been removed. There will, however, now be signs of the large figures of eight !
Straight strokes
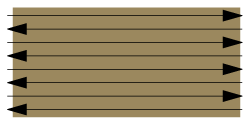 To remove the evidence of the large figures of eight, the rubber is now used in straight lines along the grain, carefully lifting the rubber off the work at the end of each stroke. Repeat this until all signs of the large figures of eight have been covered.
After the straight stokes, the workpiece must be left for 15 minutes or so to allow the polish to dry sufficiently for another coat to be applied, using the same 3 stages of figures of eight and straight strokes.
You can apply as many coats as you want but at some stage the rubber will stop moving smoothly across the surface, instead it will start to be ‘grabbed’ by the surface because of its stickiness - this is the time to stop applying polish
Allow the polish to dry overnight. The polish will have shrunk a little and the process of applying extra layers can be repeated until you are satisfied with the depth of the polish and the filling of the grain.
The surface should be gently sanded using a very fine abrasive paper (e.g. 600 wet and dry), this will also remove any particles of dust adhering to the surface). Take care to achieve an overall dullness of the surface without any obvious scratches.
Spiriting (stiffing)
To achieve the smoothness and lustre normally associated with French polish, the work is finished off with layers of thinned french polish.
This final stage of polishing is to apply very thin coats of French polish to burnish the surface to a high gloss.
Apply a coating of thinned french polish (2 parts polish to 1 part alcohol or methylated spirit). Great care needs to be taken as the thinned polish can be very fierce and pull up the existing layers of polish. Allow the polish to dry for 15 minutes or so before repeating the process. The sheen should return to the workpiece after two or three coats of the thinned polish.
Additional layers of thinned polish can be applied using straight strokes along the grain. Leave at least 10 to15 minutes between layers. As the surface is built up, the rubber will tend to stick to the surface - this is a good sign. The rubber is now doing its job of burnishing the polish to a high gloss. As the rubber begins to stick, slow down the movement and slightly increased pressure may be required to maintain control of the rubber. It is very important that the strokes are dead straight along the grain. As more layers are applied, more time may be needed between layers. Finally, the polish will have a mirror gloss finish.
Allow the workpiece to dry and harden for a couple of days before using it, but remember that it won’t stand up to heat, water or solvents – always use mats under anything placed on French polish surfaces.