
Repairing stair threads from above
Working from underneath stairs is the preferred method for repairing creaking/squeaking treads (see page gives an overview of creaks and squeaks for stair cases), however access below stairs is not always possible; it may be covered by plasterboard or other type of cladding.
This article covers curing creaks or squeaks working from above, where the underside of the treads cannot be accessed.
Securing a tread to the top of a riser
 Identify a line along the front of the tread above midway across the riser. On this line, drill 3 clearance holes to suit the screws, evenly spaced across the width of the tread - the end holes being about 10cm in from the sides.
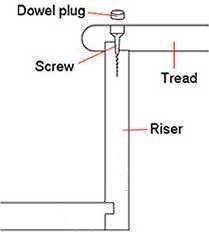
Using a larger drill bit, counter bore the top of each hole to accept a dowel plug to cover the screws after they have been fitted.
Before fitting the screws, work some woodworking glue into the joint between the underside of the tread and the top of the riser, this may not be easy if the joint is tight. Putting some glue into each hole and moving the front of the tread up and down will work the glue into the joint from above.
Tighten the tread down onto the riser using a 38mm (1.5 inch) countersunk wood screws in each of the holes. Wipe away any surplus glue from under the front edge of the thread.
Finish off by gluing a short dowel into each of the holes to cover the screw heads.
Securing a tread to the bottom of a riser
 At the bottom of the riser, position brackets as shown between the riser and the back of
the tread - use 3 evenly spaced brackets across the width of the stair - the side brackets being about 10cm
in from the sides.
At the bottom of the riser, position brackets as shown between the riser and the back of
the tread - use 3 evenly spaced brackets across the width of the stair - the side brackets being about 10cm
in from the sides.
Mark the position of the brackets on the riser and tread, remove the brackets and cut recesses into the timber using a carpentry chisel so that the front of the brackets will be flush with the timber.
Work some woodworking glue into the joint between the riser and tread, this won't be easy, it may help to brush some glue along the back of the tread and 'moving' the front of the riser backwards and forwards to work the glue into the joint.
Screw the brackets to the riser and tread - the length of the screws can be estimated by looking at the front of the tread, the thickness of tread can be seen, the timber used for risers tend to be the same thickness or slightly thinner than used for the treads.