Fitting shelves into an alcove
Alcoves, especially those on each side of fireplaces, can often be awkward spaces to use effectively. One solution is to fit shelves into them - you can fit shelves from floor to ceiling or just above a piece of furniture positioned in the alcove - making your own shelves means you can fit whatever suits your needs.
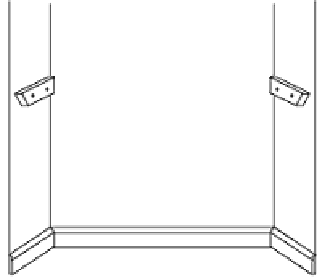
 One great advantage of fitting shelves into an alcove is that battens can usually be fitted to the side walls to support both ends of each shelf leaving each shelf unobstructed by wall brackets etc.
Ordinary planed timber (50x18mm (2x¾ inch)) can be used for the battens and will be strong enough for most shelves.
Where a stronger shelf is needed, a wooden batten can be fitted along the back of the alcove and/or attached to the underneath of the front edge of the shelf - if using chipboard or mdf for the shelves, a batten on the back wall and under the front edge is a good idea to prevent warping over time.
An alternative method to support shelving, explained below, is to use metal angle attached to the walls - this can give a 'cleaner', more 'minimalist' look.
Using timber supports.
Fitting the side supports.
- Decide on the vertical position(s) and the depth (from the front edge to the back wall) for the shelves - usually, the higher and lower shelves are deeper and the vertical gap is greater than those nearer chest level. But a nice thing about DIY is that you can decide what size shelves to have and where to position them.
- The side battens need to be about 38mm (1½ inch) shorter than the depth of the shelving (i.e. width of the plank).
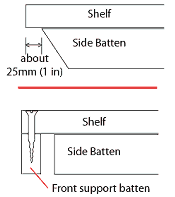
 The back end, needs to be cut square across the timber, while the front end is cut at an angle so that, when it is against the side of the alcove, the front edge recedes - this will generally give a better appearance than if the front end were just cut square. Alternatively, if a support batten is to be fixed to the underside of the shelf, the side batten can be square cut shorter so that the front end will be covered by the support batten.
Both of these are shown in the figures to right. - Drill clearance holes in the side battens to suit the fixings being used. For masonry walls, equally space the fixing holes along the centreline of each batten - with timber frame walls, check the spacing of the vertical wall members and drill the batten to suit. If the clearance holes need to be counter-sunk, this will make then 'handed', so check that the correct side is countersunk - however, if you do counter-sink the wrong side, there's probably no waste of material as 'the wrong side' will be hidden against the side wall. if the front is cut at an angle.
2 fixing holes in a side batten will usually be adequate unless the shelf is exceptionally deep, it will carry a heavy load or the side walls are weak.
Tip: If the battens will be painted, rub them down and apply primer/ undercoat before fixing them to the walls - after fixing them in place, cover the screw head recesses with filler and apply top coat paint.
- Offer up one of the side battens along the side of the alcove at the required height so that the back end is about 12mm (½ inch) away from the back wall and use a spirit level resting on top to determine the position. Mark through the fixing holes in the batten on to the wall.
- Drill the wall to take the fixings - on masonry walls use suitable wall plugs and fix the batten using screws which enter the wall at least 38mm (1½ inch) - on timber frame walls, just drill though the plaster board then use screws which will enter the frame work at least 38mm (1½ inch).
- Use a batten cut to the width of the alcove, or the shelf itself, to get the position for the batten on the other side of the alcove - use a spirit level on top of the batten/shelf to make sure this second batten is level with the first. Mark through the fixing holes in the batten on to the wall.
- Fix the second batten in the same way as the first.
Fixing a rear batten support
If a batten along the rear of the alcove is needed:
- Measure the width between the two side battens and cut a batten to about 12mm (½ inch) under this measurement.
- Drill and, if necessary, countersink fixings holes equally spaced along the centreline of the batten as appropriate:
(Masonry walls) For shelves taking light weight, space the holes no more than about 450mm (18 inches) apart (with the end holes about 225mm (9 inches) in from the ends) - for heavy loads, space the holes no greater than about 300mm (12 inches) apart (with the end holes about 150mm (6 inches) in from the ends).
(Timber frame walls) Space the holes to suit the vertical members. - Offer up the batten against the rear of the alcove and level each end to the top of the side supports. Mark through the fixing holes on to the rear wall.
- Drill wall and fix the batten as described above for the side supports.
Fitting the shelf.
The sides of the alcove may not be parallel and this may need to be taken into account when cutting the material for the shelves, at each shelf position:
- Measure between the side walls both at the back wall and the front. If the sides of the alcove are significantly out of parallel, an adjustable square may be needed to establish the angle required for each end of each piece of shelving.
- Mark out the shelving as measured and cut to size.
- Normally there is no need to secure the shelving to the battens - the weight of the shelf and what it supports will hold it down.
However, for a 'light' hold, fit a couple of panel pins through each end of each shelf so that they just enter the side battens - drill the ends of the shelf to take the pins and just tap them in.
For a stronger hold, drill each end of the shelf so that a screw can be screwed downwards into the side battens.  When fitting a support batten to the underside of the front edge of a shelf, measure across the front of the shelf between the sides of the alcove and cut a support batten to size - providing that the shelf is fairly 'heavy duty', and the load not very heavy, a piece of 50x18mm (2x¾ inch) planed timber glued and screwed edge-on to the shelf will suffice. NOTE: when the shelf is above eye level, using this method of fixing is visually un intrusive but when the top of the shelf is visible, any exposed screw heads will not look very nice.
Metal Angle supports - an alternative for alcove shelving.
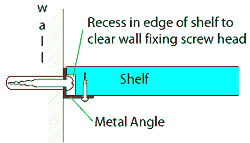
 Rather than using wooden support battens for alcove shelving (as described above), an alternative is to use metal (such as aluminium) angle to form a support ledge along the sides, and sometimes the back, of an alcove to support the shelving as shown right.
The basic method of positioning and fixing the metal angle is identical to that described above for when using wood battens i.e.
- Measure, cut, drill, position, drill the side walls and fix the side supports using dome head screws. When measuring for the side supports, make allowances for a front support batten, if one is going to be fitted. The shelving can be secured to the supports using screws from underneath, in this case, the required holes should be drilled in the metal angle before they are fixed to the wall.
- Measure, cut, drill, position, drill the rear wall and fix the back support using dome head screws.
- Measure and cut the shelving material to fit within the metal angle ledge - but it won't fit because of the dome head screws !.
- Mark the positions of the wall screws along the edges of the shelving and then cut recesses in the bottom edges of the shelf so that it will clear the screw heads - only recess the shelving immediately next to the screw head positions, this will allow the shelf to be fitted from above.
- Fit a timber front support batten if needed as described above.
- Fit the shelf from above onto the supports and, if required, secure it using screws from below.
