
Workbench Plans
These plans show how to create an extremely functional, sturdy, and affordable workbench utilizing simple and common tools.
Required Tools
- Electric Drill/Driver Or Cordless ( I favor a Makita 9.6v)
- Drill Bits/Screwdriver Bit
- Wood Hand saw
- 9/16" Socket & Ratchet or Wrench
Required Materials
- 2 - 24"x48"x¾" Plywood Sheets (aka half sheet)
- 5 - 2'x4'x8' studs I use kiln dried, but any will do)
- 16 - 3/8"x 3 ½ carriage bolts
- 16 - 3/8" nuts
- 20 - 5/16" washers
- 1 box 6x 1 ¼" deck screws
- 1 box 6x 2 ¼" deck screws
- 4 - 5/16" x 3 ½" lag bolts
- wood glue
- Metal square
General Plans
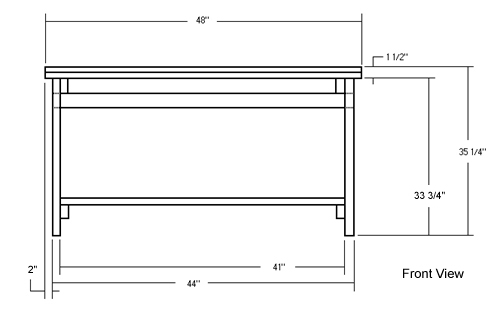

Instructions
Utilizing the 2x4's, cut the following pieces;
4@ 33 ¾" == Leg pieces
4@ 20" == Leg braces
3@ 41" == Bottom shelf pieces
1@ 44" == Rear brace
Constructing the side pieces of the bench
Lay out the two sides to the bench utilizing the four 33 ¾" leg pieces and the four 20" leg braces. See Figure 1.
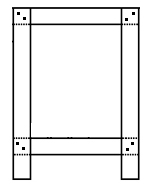 Figure 1 Workbench Side Pieces
Once the workbench sides are laid out, drill (using a 3/8" drill bit) two holes, diagonal from each other, into each corner. See figure 1.
Once the holes have been drilled, use the 3/8" x 3 ½" carriage bolts, 3/8" nuts, and 5/16" washers to fasten the side pieces together. Note; before tightening check for square-ness of legs to side braces. Retighten all carriage bolts after about a month, the wood, if indoors, will dry and shrink, loosening the bolts.
Next, take the 2x4 cut to 44 inches and attach it to the rear of side pieces. Place this piece 3 ½" down from the top of the side pieces. Drill two holes with a 5/16" drill bit about 1 ½ to 2" apart. See Figure 2. Use the 3 ½" lag bolts to secure and tighten.
 Figure 2 Lag Bolting Rear Support
Now the three 41" 2x4 pieces can be screwed to the bottom side brace of each side piece. Drill holes approximately 1 ½" to 2" apart using a 1/8" drill bit on each end of the 41" 2x4 pieces. Using the 2 ¼" deck screws, your drill and philips bit, sink the screws. See Figure 3. Note, placement of these 2x4's are not critical, but should best fit the need of the builder. I've offset mine per Figure 3.
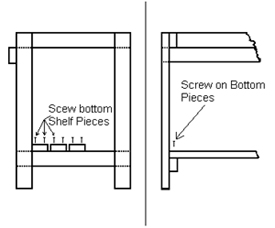 Figure 3. Side & Front View Of Screwing On Bottom Shelf
You have now completed the majority of the labor in completing this project. I will refer to these completed stage results as the "almost completed workbench", for future reference.
Constructing the top of the workbench
Compare the two 24x48 half sheet plywood piece, and pick out the piece that has the most appealing surface, this surface should be the top of your workbench. I'll call this the "good" side, which at this point you may set aside. Take the other half sheet of plywood and place it on top of the constructed side pieces. Center it per the measurements in Figure 4.
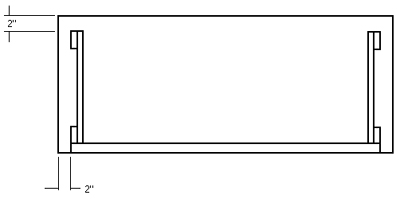 Figure 4. Centering First Top Piece
Using the 6x 1 ¼" screws, screw downwards through the ¾" plywood sheet into the 2x4 side pieces. See Figure 5. This will secure this piece to the side pieces, and strengthen the bench.
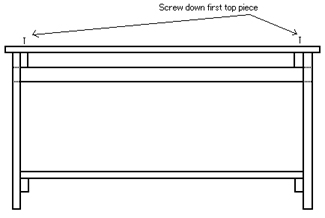 Figure 5. Screwing Down Top Piece
Take the "good" sheet of plywood, and lay in "good" side down on some cardboard or other soft, level surface to protect the "good" surface. Apply wood glue liberally. See Figure 6 for recommended glue pattern.
 Figure 6.
Now, turn the earlier constructed "almost completed workbench" part upside down, and align it with the "good" and glue covered plywood sheet. Once aligned press the two parts together, using your knees and body weight to squeeze them together - careful to keep the alignment! Once satisfied with the alignment, using the screws, and your drill with a philips screw bit, start sinking screws all around the perimeter of the workbench top from the underside. See figure 7
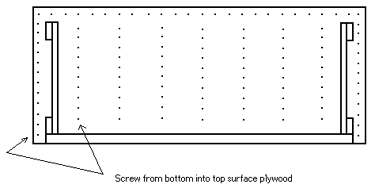 Figure 7.
Continue to sink screws into the underside of the workbench surface, you may follow the wood glue pattern illustrated in Figure 6. Once this has been done, wipe off any extra wood glue that has been squeezed out between the two sheets of plywood.
Congratulations!
You now are the proud owner of a low cost, very nice, and functional workbench that will endure most tasks.
Copyright 2004 Couts-Gould Designs