Log Cabin Playhouse
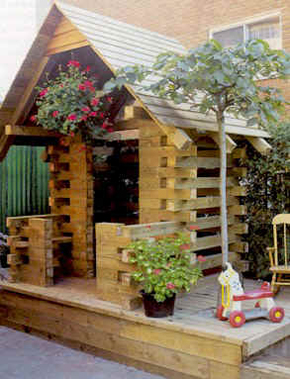 This log cabin playhouse is a very interesting design that kids will love. Although you may notice it's openness, I guarantee if you build it you will have one of the most popular structures in the neighborhood. Kids will love to climb on it and play in it! With our projects, we present you with the concept and information to build it, while letting you customize it to fit your needs. If questions arise just contact us for free advice and guidance.
The design of this playhouse allows for change. For instance the photograph shows 6x6 timbers used as roof rafters, and our drawing uses 2x6. This makes construction easier while not altering the visual effect of the playhouse. The photograph shows the 4x4 timbers extending past each other to give a log effect, while our drawing shows the corners flush. The choice is yours! The photo shows an overhanging front porch requiring a substantial beam to hold the roof. For an easier and safer design we placed a 4x4 support on the 2 front corners of the porch. The visual effect is very similar.
All lumber is pressure treated except the OSB roof sheathing. Our roof will be standard 3 tab fiberglass shingles nailed over the roof sheathing. All wall framing is 4x4 pressure treated lumber. An interesting alternative to check out is the price of the 3x5 pressure treated landscape timbers. They may be less expensive and they have the round edge "log look".
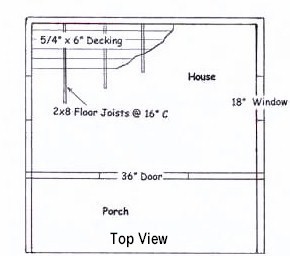
The floor system is built on a 8' x8' frame of 2x8 pressure treated floor joists spaced on 16" centers. Cut the main floor joists 3" shorter than 8 ft so when the 1 1/2" band board is added to the front and back the overall finished measurement will be 8' x8'. If you want the logs to overhang on the corners, simply move your walls in 6 inches on your floor system on all 4 sides. This will make your cabin 7ft by 7ft.
Level and support this floor system as needed for your site. It can sit directly on the ground or be raised on bricks or blocks as desired. Start with a secure base and you will have a safe structure. It is important to support this base at the 4 corners or have it sitting on flat ground.
A 4x4 filler will be used to build the walls where you have a smooth edge surface such as at windows and doors. All fillers will be 8" long, and you will use a lot of them. To fasten the 4x4 timbers together you have a few choices. You can purchase 6 inch spikes and pound them through each layer of lumber with a small sledge hammer. (two in each 8" filler) Another choice is to toenail all lumber with 16d galvanized nails on all sides. A third choice, my preferred method, is to screw galvanized 3 inch Phillips head screws in place of nails. HINT: Check out square drive deck screws - same as Phillips head but better grip on the screw driver head.
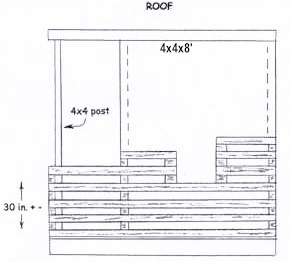
The walls will be approximately 7 ft. tall. End each side wall on a layer where there is a 4x4 beam. (Alternating rows have wood/space/wood/space/etc....end on wood.)
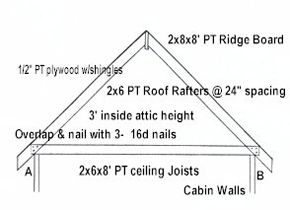
Roof height is approximately 3 feet in center. The easiest way to accurately cut the roof rafters is to lay the pattern out on a large flat surface such as garage or driveway. Measure 8 ft across and 3 feet up at the center and lay your uncut 2x6 roof rafter on this template. The measurement A to B in the drawing below will be the outside measurement of the walls you built. (Probably 8' unless you overlapped the logs to have overhanging ends) It will be easy to cut the correct angle at both ends of this rafter using this method. Cut an additional 3/4" from the top angle where it meets the ridge board (to allow for the thickness of the ridge board). Your ceiling joist will be nailed to the bottom of the roof rafter with 3 16d nails as shown. Use this as a pattern and cut remaining rafters the same by tracing. (ridge board is the 2x8 running front to back at the top of the peak that each rafter sits on. Flush each rafter to the top and nail in place) Install roof rafters every 24" starting at the front and ending at the back. Install OSB sheathing horizontally.
Approximately 1 1/2 pieces will be used on each side. Install shingles and your ready.
Shopping List:
- 12 Pressure Treated 2x8x8'---1 for ridge board, 11 for floor joists
- 18 Pressure Treated 5/4x6x8' decking boards---This is 2 more than you need
- 60 4x4x8' Pressure Treated (or 3 1/2x5x8' landscaping timbers)---Walls
- 15 2x6x8' Pressure Treated---Roof Rafters and Ceiling Joists
- 3 4x8'x1/2" Pressure Treated Plywood---Roof Sheathing
- 1 Square Roof Shingles (3 Bundles)
- 20lbs 3-3 1/2" Galv. Nails or Screws for wall, roof & floor construction
- 5lbs 2 1/2" Galv. Screws for deck board installation
- 5lbs Galv. roofing nails