
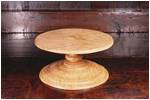
Cake Stand
Give your baking a lift with this cake stand in oak. By Chris Child.
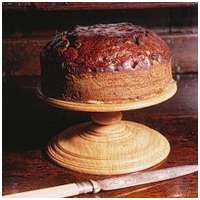 I turned this stand using some offcuts of English oak left over from a cabinet making project, but almost any wood will do as long as it's well seasoned and stable. The top and base are turned out of 178mm x 32mm discs, and the stem from a 63mm long, 51mm square blank.
The Top
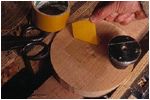
 Turn the underside of the top first, which requires gripping so that the top face is unaffected by screw holes or other fixing marks; I used double-sided tape applied to the face of a faceplate. Fit the disc in the bench vice and plane it so that the surface is flat and smooth, then apply the tape to the central area and burnish it down with the handle of a screwdriver. Cover the faceplate with another piece of tape and, after rubbing it down, peel off the backing, bring the two sticky surfaces together and cramp them in the bench vice.
This method should be perfectly adequate to hold a small shallow disc like this, but if you're in any doubt, give the back of the blank a sharp thump with the palm of your hand. If the disc is dislodged, then you'll need to increase the surface area of your faceplate by fitting it with a wide disc of plywood.
The Rim
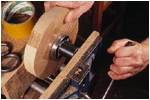
 With the work secured to the lathe, trim the outer edge of the disc until it's concentric and free from any sign of the bandsaw cut. The best way to get a good finish on the rim of the disc is to use a small bowl gouge. Hold it on its side so that the bevel of the tool is in line with the square edge of the disc and then feed it slowly across from one side and then from the other. In this way the corners of the disc will be preserved and the two areas of end grain will be sliced off cleanly by the shearing action of the gouge.
Underside Shape
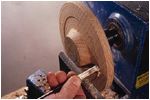
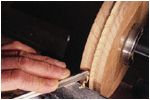
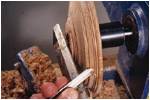
 Next, move the tool rest round so that it's in line with the face of the disc, and use the same gouge to scoop away the outer area of the underside, and reduce the thickness at the rim to about 7mm. Work the gouge from the centre outwards so that it cuts with the grain and produces a cleaner finish. Leave a tapered projection at the centre of the disc to provide a thick bracket section into which the stem of the cake stand can be fitted.
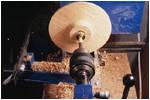
Flatten the projection with a pass or two of the gouge, then bore a 25mm diameter hole using a sawtooth centre bit held in the tailstock of the lathe.
Top Surface
 I used the 38mm mini jaws on my masterchuck to hold the work on the lathe for the next stage - turning the surface of the top. To make sure that the dovetail recess is the right angle, I ground a specially-angled scraper which I fed into the corner of a recess formed with a beading tool.
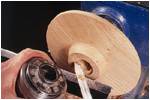
After checking that the jaws fit into the recess and hold the workpiece concentric, reverse the top and fix it on the lathe using the chuck. Flatten off the top with the gouge or a round-nosed scraper, working from the centre outwards and removing a very shallow depth of cut with each sweep.
The rim can be decorated with a small bead. First, using a small beading or parting tool, part into the face of the top two or three millimetres in from the edge and form a shallow step. Then move the tool rest round at an angle to the rim and gently nibble the corner into a bead or torus moulding using a skew chisel held over on its side.
Base
 To hold the base on the lathe, you can use the tape method again, but as I intended to cover the underside of the base with baize, which completely hides the screw holes, I used the simpler faceplate and screw method.
In the same way as for the top, bore out the 25mm hole for the stem spigot, then flatten off a small area around the side of the hole for the stem to rest on.
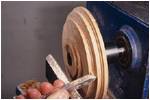
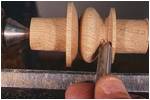
To form the mouldings in the base, first reduce the disc to a series of square-sided steps by parting into the face of the disc with the beading tool. Leave small steps in the corners of the larger steps to form the fillets which will create little junctions between each moulding.
Once you've checked that the corners of the steps are crisp and clean, you can then start rounding off the large corners to form the curved sections of the mouldings. This is done using very fine cuts with the point of a spindle gouge, working on each moulding in turn. As in any branch of woodwork, cut with the grain as much as possible, which in this case means feeding the gouge in the direction towards the outer edge of the base each time.
Stem
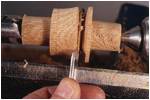
 The stem is a simple piece of spindle turning which involves mounting the square block on the lathe between centres and turning it down to a cylinder with a roughing gouge. Cut the 2.5mm-diameter spigots on each end using the beading tool, and then taper the middle section slightly with a gouge. Use a skew chisel to slice a deep 'V' cut into the side of the taper, close to the base and then form the convex curves using the corners of the parting tool.
Hollow out a deep cove with the spindle gouge and then round off the remaining corner to form the flowing curve of an ogee vase shape.
Sanding & Polishing
 These are cut to size but may need slight adjustment to fit between the top arch and the appropriate inner strip. They are cut from 1/4in (6.4mm) MDF rather than 3/4in (19.1mm) so that the smooth face of the MDF is vertical. The join between the arch and the right hand inner strip in particular must be smooth so that the balls are not deflected from their path around the arch.
Inner Lid
Whichever kind of finish you use - whether it's a coat of cellulose sanding sealer, or a simple wax polish applied with a cloth - to obtain the best results you always need to sand the work thoroughly beforehand. But while it's important to remove all traces of tool marks, broken grain and the scratches caused by the coarse abrasive, you don't want to round off the corners so that you lose the fine detail of the mouldings. I start off with a piece of 150-grit aluminium oxide abrasive but keep it away from the small fillets and the square corners. These are only sanded when I've changed over to the finer 240-600 grit finishing abrasives.
Originally on getwoodworking.com