
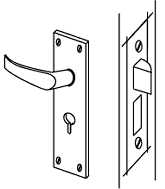
How to fit a mortice lock
It is quite straightforward to fit a mortice lock to a wooden door but it does require accurate measurements and cutting so that the mortice lock and striker plate fit correctly.
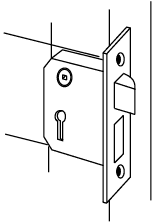
Two sorts of mortice lock are available:
- Sashlock - which has a door catch and lock bolt - so has a keyhole and door handle spindle.
- Deadlock - which just has a lock bolt - without the door catch or door handle spindle - so just a the keyhole.
The notes below refer to fitting a sashlock type of mortice lock; to use them as a guide for fitting a deadlock, just ignore the references to the door catch and door handle.
The fitting instructions supplied with a mortice lock will normally specify the thickness of door it is designed for, problems will arise if a mortice lock is fitted to a door thinner than it is designed for.
The latch on the lock may need to be changed before fitting so that the curved part of the latch meets the striker plate on the door frame jamb - this is easy to do, see our page on reversing the latch on mortice locks.
Fitting the lock to the door
 First decide on the height on the door for the mortice lock; if in doubt, look at other locks in the property - ideally all the
door handles should be the same height from the floor. On doors with a horizontal mid rail, the lock should be positioned clear of the mid-rail joints otherwise the joints will be weakened, the lock should be fitted in the centre of the rail to clear the upper and lower joints.
First decide on the height on the door for the mortice lock; if in doubt, look at other locks in the property - ideally all the
door handles should be the same height from the floor. On doors with a horizontal mid rail, the lock should be positioned clear of the mid-rail joints otherwise the joints will be weakened, the lock should be fitted in the centre of the rail to clear the upper and lower joints.
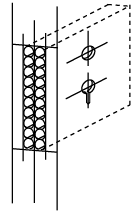
Place the body of the mortice lock against the side of the door and mark the top and bottom edges of the main body on the side of the door.
Also mark the positions of the handle spindle and the keyhole by marking through the body of the mortice lock - allow for the thickness of the front plate of the lock as this be recess into the edge of the door.
Drill holes in the door for the handle spindle and keyhole - the hole for the handle spindle hole will need to be at least as
big as the spindle boss of the lock - for the keyhole, drill the top hole and then cut out the rest of the shape using a thin pad
saw.
 Using
a carpenters square on the door edge, mark the top and bottom positions of the mortice lock body to the edge of the door.
Using
a carpenters square on the door edge, mark the top and bottom positions of the mortice lock body to the edge of the door.
Mark the vertical centre line of the door thickness and from this mark, mark out the width of the mortice lock body equally either side of the centre line. Use a sharp chisel to mark along the lines for the body of the lock to establish the edges - by cutting the surface of the wood, this should prevent any wood lifting from the surface beyond the lines required.
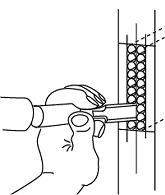
Drill a series of holes into the edge of the door using the marks as a guide on the edge of the door - this will create a rough
hole to take the body of the mortice lock (by using a drill, most of the unwanted material will be removed quite easily and quickly).
Ensure that each hole is at least as deep as the body and front plate of the lock. Take care to keep the drill parallel with the
sides of the door - if the hole is not square to the edge, the mortice lock may not fit square in the door, and the drill bit could
break through the side of the door.
 After
all the holes have been drilled in the edge of the door, tidy up the hole by removing waste wood and roughly smooth the sides of
the hole using a sharp chisel.
After
all the holes have been drilled in the edge of the door, tidy up the hole by removing waste wood and roughly smooth the sides of
the hole using a sharp chisel.
Once the hole has been tidied up, check whether the body of the lock fits - if necessary, identify and remove any area of wood restricting the fit - the fit needs to be a slide fit without too much slack. Ensure that the body of the lock fits into the door square to the edge - so that the front plate of the lock fits squarely onto the edge of the door, and that the sides of the front plate are parallel with the sides of the door.
 Once
the hole for the body of the lock has been finished, push the lock into the door with the front plate against the edge - mark around
the front plate onto the edge of the door.
Once
the hole for the body of the lock has been finished, push the lock into the door with the front plate against the edge - mark around
the front plate onto the edge of the door.
Remove the lock from the door and use a sharp chisel to mark along the lines for the front plate of the lock to establish the edges - by cutting the surface of the wood, this should prevent any wood lifting from the surface beyond the lines required.
Cut out a rectangular recess in the edge of the door to take the front plate of the lock using a sharp chisel.
Fit the lock back in the door so that the front plate is flush with the edge - check the positions of the holes for the key hole and door handle spindle from both sides of the door - if necessary, remove the lock and adjust the size and/or position of the holes so that they line up with the appropriate parts of the mortice lock body.
When everything lines up, refit the mortice lock into the door and secure it using screws through the front plate.
Fitting door handles/key plates
 When
fitting the handles or key plates to the door, ensure that screws of appropriate length are used - the screw positions for both
sides of the door will probably line up with each other or may line up with the body of the mortice lock, using overlength screws
may mean they will hit the body of the lock, or the screw from the other handle before they tighten down.
When
fitting the handles or key plates to the door, ensure that screws of appropriate length are used - the screw positions for both
sides of the door will probably line up with each other or may line up with the body of the mortice lock, using overlength screws
may mean they will hit the body of the lock, or the screw from the other handle before they tighten down.
Fit the door handle spindle and then the door handle on one side - the handle shown to the right incorporates the key hole cover, however some door handles and keyhole covers are separate pieces of door furniture.
Before the door handle is fitted to the second side of the door, check the length of spindle; it may need to be removed and shortened to allow the handles on both sides to fit flat onto the door.
When fitting key hole plates, make sure that they line up with the key hole in the body of the lock and take care to ensure that the hole in the plate is vertical - any slight misalignment will be noticeable.
Fitting the striker plate
 Extend
the bolt from the lock by turning the key into the locked position and gently close the door onto the door frame.
Extend
the bolt from the lock by turning the key into the locked position and gently close the door onto the door frame.
Mark the door frame with the top and bottom positions of the lock bolt and the door catch.
Open the door and transfer these marks onto the inside face of the door jamb.
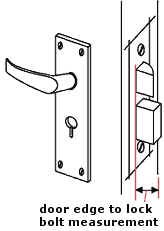
Measure on the edge of the door, the distance from the closing side of the door (i.e. the side which goes against the door stop inside the door frame) and the outside of the lock bolt of the mortice lock.
Note: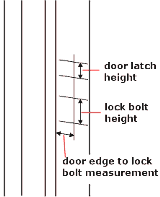 Mark
the this 'door edge to lock bolt' measurement on the door frame from the door stop.
Mark
the this 'door edge to lock bolt' measurement on the door frame from the door stop.
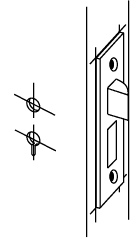
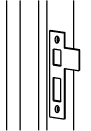
Place the striker plate on the door jamb so that the holes in the striker plate line up vertically with the latch/bolt marks made on the door frame, and the front of the holes lines up with the horizontally with the 'door edge to lock bolt' mark. The holes in the striker plate are usually larger than the actual lock bolt and catch, so adjust the position to give equal spacings vertically about the marks but horizontally the front of the holes must line up with the vertical mark.
Mark onto the door jamb around the outside of the striker plate, and also inside the holes for the the lock bolt and door catch. This needs to be done accurately to ensure that the door closes and locks correctly.
 Use
a chisel to cut out the holes for the door catch and lock bolt in the door jamb - measure the projection of the catch and bolt
from the edge of the door to determine the depth required in the door jamb - make an allowance for the gap around the door when
it is closed.
Use
a chisel to cut out the holes for the door catch and lock bolt in the door jamb - measure the projection of the catch and bolt
from the edge of the door to determine the depth required in the door jamb - make an allowance for the gap around the door when
it is closed.
Use a sharp chisel to mark along the lines for the striker plate on the door jamb - by cutting the surface of the wood, this should prevent any wood lifting from the surface beyond the lines required. Cut out a recess in the door jamb to take the sticker plate using a chisel.
Position the striker plate in the recess in the door jamb and secure by using screws.