
Architrave moulding using
Architrave is the moulding fitted around the frameworks of internally doors, windows, and loft hatches normally it is decorative timber. By using architrave, the joint between the wall/ceiling and the timber frameworks are hidden.
Architrave will also hide any shrinkage and movement between the two which subsequently occurs.
Architrave should be fitted to the framework after all the wall/ceiling surfaces have been finished and before decoration, fitting skirting boards and doors.
Three lengths of architrave are normally required for each side of a door and for the inside of a window, - two vertical side pieces and one horizontal head piece. If a door or window frame is hard up against a return wall, then only one vertical piece may be required.
A loft hatch, normally requires four pieces (one for each side) of architrave with mitres at both ends of all four pieces.
The end of each piece of architrave, where it joins another piece, is usually mitred - typically with a square topped framework, the ends will meet at 90 degrees so the mitre cuts on each piece will be 45 degrees (half the framework angle). However, sometimes, the framework may not be square, in which case, the angles will need to be measured and the appropriate angle used to cut the mitres.
Marking out the framework
 Architrave
is normally fixed to the framework so that it sits back from from the edge with a margin of about 4 to 5mm - too near the edge
can restrict the operation of the hinge and lock/catch striking plate, whereas too big a margin will reduce the amount that the
architrave overlaps onto the framework thus reducing the available nailing area. It's a good idea to try to keep the size/style
of architrave moulding and the margin around the framework the same throughout a property - although in some cases this may not
be desirable or possible.
Architrave
is normally fixed to the framework so that it sits back from from the edge with a margin of about 4 to 5mm - too near the edge
can restrict the operation of the hinge and lock/catch striking plate, whereas too big a margin will reduce the amount that the
architrave overlaps onto the framework thus reducing the available nailing area. It's a good idea to try to keep the size/style
of architrave moulding and the margin around the framework the same throughout a property - although in some cases this may not
be desirable or possible.
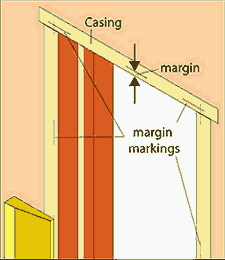
Mark the framework with the required margin gap by using short pencil marks across each corner and about 200mm apart around the framework, take care to ensure that all the marks are parallel to the edge of the framework and equally set back. These short marks will be enable the architrave to be accurately marked for cutting the mitres and fitting around the framework.
Marking and cutting the architrave
Take care that all the marking and cutting of the architrave is done accurately, this will help achieve neat corner joints.
Pay special attention when marking and cutting architrave to ensure that the angle is cut the correct way for the shape of the moulding - the thinner side of architrave is normally the side which is nailed to the framework - for a mitred end, this will be the shorter side.
To cut an accurate 45 degrees mitres, use a mitre block, most will accommodate architrave up to about 12cm. If you are using larger architrave, or have to fit architrave around a number of openings, a mitre saw may be worthwhile (either a manual or a power one - Power Mitre Saws can usually be hired which makes life even easier). Mitre Saws allow for the angle of the mitre to be adjusted, so they are also worthwhile when fitting architrave around out-of-square framework.
 The first
length of architrave to mark and cut is the head piece - usually this has both ends cut with a 45 degree mitre.
The first
length of architrave to mark and cut is the head piece - usually this has both ends cut with a 45 degree mitre.
Start by cutting a 45 degree angle at one end of a length of architrave - remember that the thinnest edge of the architrave goes against the framework.
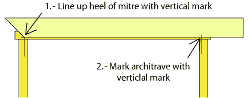
Once the first mitre has been cut, offer up the length to the markings on the framework across the top of the door and position the 'heel' of the mitre to the vertical marking on the side framework (left side of above illustration). Hold the architrave firmly in place and transfer the vertical marking on the opposite side framework on to the other end of the architrave. Remove the architrave, using the mark on the uncut end as the 'heel' for the mitre, mark and cut the second end. This gives the head piece cut to length and appropriately. For a loft hatch, all four pieces are, in effect, 'head pieces' with each end of each piece mitre cut.
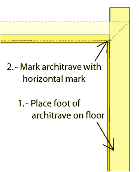 Begin the first side piece piece of architrave by cutting square the bottom end, then stand it on the floor (with windows, rest the bottom on the inner window sill) and against the framework with the vertical side lined up to the margin markings on the side framework. Firmly hold the architrave in this position and mark at the top of the architrave with the position of the horizontal margin marking. Remove the architrave, and cut a 45 degree mitre from this mark.
Follow the same procedure on the other side of the framework to cut the other side piece of architrave.
Fixing the architrave
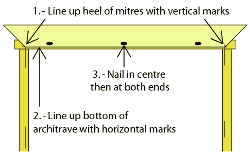 With all three pieces of architrave cut, place the head piece across the top of the framework; line it up with the horizontal margin markings, with the 'heel' of the mitred corners in line with the vertical margin markings, and fix it using a 50mm lost head nail (or panel pin) about half way across the framework timber and near the edge of the architrave, do not drive the nail full home. Add further nails about 30mm away from each end, ensure that the piece of architrave remains lined up with the horizontal margin markings. Nail in additional lost head nails along the top piece about 300mm apart. Leave all the nails protruding.
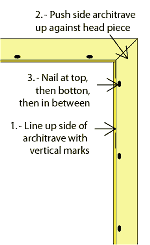 Place one of the side pieces of architrave in position against the side of the framework so that it lines up with the vertical margin markings, the top 45 degree mitre should automatically fit tightly against the mitre of the head piece. Nail the side piece to the side framework - start at the top, about 30mm down from the top mitre using a 50mm lost head nail (or panel pin) near the edge of the architrave. Then nail at the bottom of the vertical piece of architrave to the framework about 30mm up from the floor, ensuring that the architrave remains in line with the vertical margin marks, nail in another nail about halfway up the framework. Nail in additional lost head nails up the side piece about 300mm apart. Again, leave all the nails protruding.
Fit the other side piece of architrave using the same procedure.
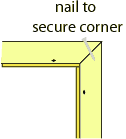 Drive in a 50mm lost head nail (or panel pin) at an angle across the top corners to join the two sides of the mitres - this will keep both halves of mitre joints flush.
To finish the architrave, drive all the nails flush with the architrave and then, using a punch, punch them slightly below the surface - cover the nail heads using a suitable filler before painting.