
Garden Arch
A simple wooden arch in a garden makes an ideal feature to divide it into separate areas or just for training decorative climbing plants.
In this article we describe making a simple, but decorative, timber arch.
The materials list etc are for an arch 1.2m wide, 0.9m deep and 2.4m high which would fit over a garden path, but the design allows for the dimensions to be changed to suit individual requirements by just changing the lengths of timber used.
If the dimensions of the arch are changed significantly, the size of timber used may also need to be changed.
Materials for the arch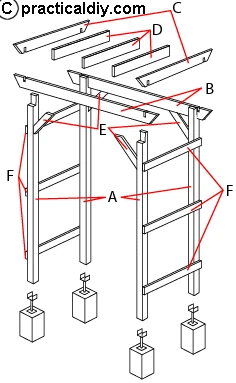
Timber - use pressure treated timber, it will be more expensive but the arch will last longer. After cutting the timber. the sawn edges will need to be treated with a similar wood preservative before assembly.
| Ident | Part | No. | Timber size | Length |
|---|---|---|---|---|
| A | Posts | 4 off | 75x75mm | 2.4m |
| B | Lintels | 2 off | 140x35mm | 1.5m |
| C | End "rafters" | 2 off | 140x35mm | 1.2m |
| D | Middle - "rafters" | 3 off | 140x35mm | 0.9m (these will need to be trimmed to fit) |
| E | Braces | 4 off | 90x35mm | 0.3m |
| F | Side braces | 6 off | 95x35mm | 0.9m |
Hardware - use marine quality or stainless steel fixings to avoid corrosion.
| 75x75mm post sockets inserts | 4 off |
| 6x10cm coach bolts with large washers | 4 off |
| Assorted screws and nails |
Methods to position the uprights
There are various choices for positioning the uprights of the arch, you can choose whichever suits you, there's no 'right' or 'wrong' method. The choices are:
- Using post sockets; depending on the type, these can be driven into the ground (sockets with spikes), bolted onto concrete bases (sockets with mounting flanges) or embedded in concrete (sockets for embedding). These make the arch fixed and secured. Whichever type is used, the bottom of the uprights will be held up off of the ground so the timber uprights will not rot. Sockets are available for only a limited number of timber sizes, so this will restrict the size of timber uprights used. The information below deals with using sockets embedded in concrete.
- Using short metal stakes driven into the ground or embedded in concrete which can be bolted to the uprights. These make the arch fixed and secured with the advantage that any size of timber uprights can be used. Details of using stakes is given in our other article which needs to be read in conjunction with the instructions below.
- Not using anything to secure the arch, just standing it on concrete, bricks, or paving slabs - this is not permanent so the arch could be moved to a new position if required. However, not being secured, the arch may move in high winds etc. A free standing arch will need more bracing to stiffen it, details of the extra braces etc are given in our other article which needs to be read in conjunction with the instructions below.
Laying out the post foundations
The method used will depend upon the method for positioning the uprights chosen - the remained of this article below deals with using post sockets embedded in concrete, the other options are covered in more detail in our other article.
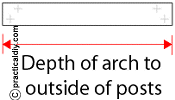
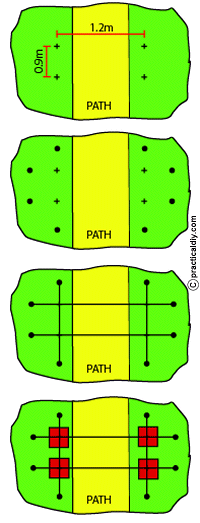 The 'footprint' of the arch as detailed is 1.2 x 0.9m, mark this 'footprint' on the ground at the required position.
From each of these marks, measure out about 30cm (12 inches) in each direction and drive a short wooden peg into the ground (that is 8 short wooden pegs).
Run a string-line between the 2 extreme pegs across each face of the arch position - the string lines need to be high enough so that the top of the post sockets will fit underneath when they have been embedded in concrete. Measure diagonally between the crossed lines - these will be equal if the 'box' is truly square.
The points on the ground under where the strings cross will be the centres for the post sockets. A hole 30 x 30cm needs to be dug out around these points to a depth of about 30cm.
Mix up a dryish 1:2:4 (cement: sand: coarse aggregate) concrete mix.
Fill the bottom of a hole with some of the concrete and position a post socket so that its centre is directly under the crossed string-line and the inside of the socket is above ground level. Pack in some more concrete to hold the socket in place.
Repeat embedding the other post sockets in the same way but use a length of timber and spirit level to ensure that each socket is at the same height.
Complete filling in the holes with concrete and double check that the middle of each post socket is still directly underneath the crossed strings and that the sockets are vertical.
Cutting and erecting the posts
(The letters used below to identify the parts refer to the illustration and list above)
![]() Once the concrete has hardened, place the four arch posts (A) into the post sockets, use a spirit level to check that the posts are vertical - the posts will wobble in the sockets, the check is just to ensure that the posts CAN be vertical.
Once the concrete has hardened, place the four arch posts (A) into the post sockets, use a spirit level to check that the posts are vertical - the posts will wobble in the sockets, the check is just to ensure that the posts CAN be vertical.
Remove the posts; use a length of timber across the top of the sockets and a spirit level to check they are level. If the sockets are not level, put the longest post in the lowest socket and the remaining posts in the other sockets. Holding the posts vertical, use a length of timber and a spirit level to transfer a height between all the posts - the actual height is unimportant, just that all the posts are marked with the same height.
Identify each post with its associated socket so that you will know which post goes where, also mark a face of each post to indicate its orientation.
Take the posts down and lay them next to one another so that the 'marked height' on each post lines up. Measure the required height on the posts and cut them to length. Measure down 14cm from the top of each post on the outside face, mark out a cutting depth of 35mm and cut away the top of the post to take the lintel.
Cutting and fitting the lintels
Fit the posts in their appropriate socket, use a spirit level to get them vertical and then check that the measurements between the outside of the posts are 1.275 and 0.975m. If the actual dimensions are different, this difference needs to be taken into account when measuring for the lintels, end rafters and the cut outs in them.
 Measure and cut two pieces of timber for the lintels (B).
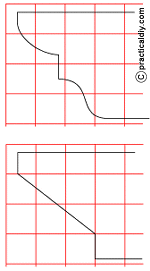
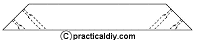
The ends of the lintels look best with a shapely profile - two possible profiles are shown to the right; make a template of the profile from a piece of cardboard and use this to mark both ends of each lintel so that the profiles will be consistent.
Cut the end profiles - a handsaw can be used to cut straight edged profiles, or use a jigsaw for a curved profile.
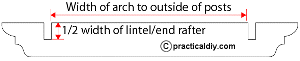
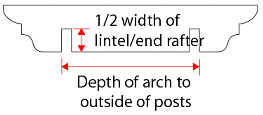
Establish and mark the centre of each lintel on the top edge. On each lintel, measure out on both sides of these marks half the outside width of the arch (this will be 0.632m if the width previously measured was 1.275 but will need to be different if the posts width differed). Measure outwards from each of these marks, an additional 35mm (i.e. the thickness of the timber for the end rafters), and mark this. From these two marks, use a carpenter's square to mark down the lintel half the lintels height. Use a saw to cut the sides of these slots and knock out the waste using a chisel.
Position the lintels across the top of posts so that they sit in the cut-outs at the top so that the inside edge of the slots in the lintels are flush with the outsides of the posts - use a clamp to hold the lintels in place and, after checking that the posts are vertical and the lintel horizontal, drill through the centre of the lintel and post at each side of the arch and use a coach bolt with a large washer under the nut to secure the lintel to the posts.
Cutting and fitting the end rafters
 Measure and cut two pieces of timber for the end rafters (C).
Use the same template as was used for the end of the rafters to mark out the end profiles on each end rafter. Cut the end profiles in the same way as used previously.
Establish and mark the centre of each end rafter on the bottom edge - on each rafter, measure out from this mark half the depth of the arch (this will be 0.482m if the depth previously measured was 0.975m but will need to be different if the posts depth differed).
Measure IN 35mm from these marks towards the middle of the rafters and make another mark. Using a carpenter's square from these marks, mark across and then half way down the rafters. Use a saw to cut the sides of these slots and knock out the waste using a chisel.
Slot the end rafters into the lintels from above so that the slots interlock. Drill through the end rafters to suit and secure them to the posts using screws.
Cutting and fitting the arch braces
 The 'standard' arch uses 4 braces, additional braces are needed if the arch to be free standing - see our other article for details of these.
For the 'standard' arch, cut from 90x35mm timber four braces (E) with a simple 45° mitre at each end so that they can be fixed between the posts (A) and the underside of the lintels (B).
Drill through the mitre ends to provide clearance holes for the fixing screw. Before fitting each brace, make sure that the angle between the post and the lintel is a right angle, position the brace between the two surfaces so that the face of the mitres fits flat and secure them using screws.
Cutting and fitting the side braces
 Measure the width of the side of the arch between the outside faces and cut six pieces for the side braces (F) from 90x35mm timber.
Drill two clearance holes in each end of each side brace to suit the width of the posts.
Before fitting the side braces, ensure that the posts are vertical by checking that the angle between each post and the underside of the end rafters is a right angle
Position and secure the side braces to the posts using screws.
The upper brace should be positioned about 30cm down from the end rafter, the lower brace about 30cm up from the ground level and the middle brace positioned about half way between the upper and lower braces.
Cutting and fitting the middle rafters
Measure the distance between the inside faces of the main lintels and cut three middle rafters (D) from 140x35mm timber to suit.
Use nails driven in from the outer face of the lintels into the end grain of the middle rafters to secure them - you'll probably need assistance so that the rafter can be held in place while the nails are driven home. Position one rafter halfway across the arch, and the other two halfway between this first rafter and the end rafters.
Finish off the arch
When the arch has been assembled, go around it and ensure that all the fixings are tight.
Finally, depending on the type of timber used, finish off with a coat of exterior paint, oil or other suitable timber treatment - treated or hard timber may be left bare to weather naturally.