
Mixing Concrete
The three main options for mixing concrete are:
- Mixing by hand - this is probably only suitable where less than about ¼m³ of concrete is required for a job providing that a reasonably fit person is available.
- Using a cement mixer - this is generally suitable where between about ¼m³ and 2m³ of concrete is required. It will require continuous mixing of loads and normally someone else to do the laying of it.
or - Buying in Ready Mix - for jobs requiring more than about 2m³ of concrete, it is probably best (and cost effective) to buy in a lorry load of ready mixed concrete.
The above quantities are only rough guidelines for quantities to be used for one job. When a number of areas of concrete can be laid over a number of days, then the quantity of concrete each day is the important consideration, not the total for all areas.
Mixing cement by hand or using a cement mixer do allow flexibility; you can do how much, or as little as you want at any one time, and change your plans if the weather changes - having a delivery of ready mix concrete scheduled for delivery means you have to deal with it when it arrives on site, to cancel it probably needs 24 hours notice or a steep charge.
- Avoid breathing-in cement dust and getting it on your skin - wear a face mask.
- The concrete releases an alkali when it is wet, this can damage the skin. So avoid handling the wet mixture by hand and wash it off immediately using plenty of water if it does come into contact with skin.
- If cement dust or concrete splashes enter the eyes, wash it out using plenty of water and seek medical attention immediately.
Mixing concrete by hand
Typically in the UK, concrete is hand mixed 'on the deck' (i.e. the ground), generally using either a slab of existing concrete or a large mixing board - both of which can easily be hosed down and cleaned off afterwards.
In other parts of the world they seem to prefer to mix the concrete in a barrow or tub - here we'll discuss doing it the UK way.
Each of the ingredients for the concrete need to be measured, by volume, to get the proportions right, some people do this by shovel load but, unless you have experience, it is better to measure the cement and ballast (or sharp sand/gravel) actually using a bucket, you tend to get more ballast on a shovel than cement so just counting the shovel loads can be misleading. Do not use too large a bucket as after you have measured all the ingredients, you could end up with a large pile to mix in one go. It is a lot easier to mix two smaller piles than just one large one.
- Clean off the working surface to remove any odd debris and wet the area.
- Carefully measure out about half the ballast (or sand and gravel) you are go mix - and dump it in the mixing area to form a cone shape.
- Use a shovel to form a crater in the middle of the heap, then measure out all the cement required and add this to the crater.
- Measure out the remainder of the ballast (or sand and gravel) you need and add this to the top forming a cone shape.
- Without adding any water, use a shovel to mix all the ingredients together, work around the heap turning over each part three or four times until the mixture is evenly coloured (grey).
-
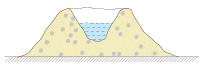 Use a shovel to reform a cone shape and make a crater in the top of the heap - add some water to the crater.
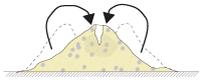 Use a shovel to move the mixture into the central crater from around the edges and turn it over to distribute the water throughout the mixture. Watch for any water 'escaping', use the shovel to trap any with the mixture.
- As all the water becomes absorbed, reform the heap, make a crater in the middle, add some more water, and turn the heap until the whole mixture is wetted. Be careful not to add too much water, you can always add some more.
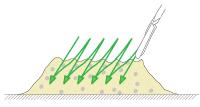 As all the dry material becomes wetted, flatten out the heap and use a shovel to 'chop' into the top moving around the heap as you do so to evenly mix in the water.
A mix which has the right amount of water is smooth and plastic, not over-wet and runny nor dry and crumbly. As a guide, watch the ridges as the top of the heap is 'chopped' - if the depressions between the chops fill with cement slurry, the mixture is OK; if it looks a watery slurry or the ridges don't stand up, the mix is too wet; if the depressions remain dry, the mix is too dry.
Advice: One of the most common errors made when hand mixing concrete is adding too much water. Add a little water each time, the mix will suddenly be at the right consistence. By keeping part of the dry mix to one side, this can be added into the heap if it does appear to be too wet.
After you have finished mixing the concrete, wash and brush down the area used for mixing it to remove any remains of it.
Using a cement mixer for concrete
- Ensure that you understand the operating instructions for the mixer; especially that you know where the 'OFF' switch is.
- When using an electric cement mixer, ensure that an RCD is protecting the supply.
- Ensure that the cement mixer is stable and positioned on firm and level ground.
- Keep your hands and tools out of the rotating drum - pour the ingredients in from above.
- Always wear goggles to protect your eyes as concrete can splash out as the drum rotates.
Cement mixer vary in shape and size and can be either electric or petrol. Both electric and petrol types are readily available for purchase or can usually be hired; electric cement mixers are usually easier to use providing that you can get mains electric (with a RCD) to it, you will also need to have space near to the cement mixer for the heaps of ballast (or sand and gravel) and space to work, you don't want to be moving barrow loads of ballast around more than you have to.
The cement mixer should be set up on a slab of existing concrete (which can be cleaned down afterwards), on a large mixing board or other area which can be cleaned down; no matter how much care you take, odd pieces of ballast, sand, gravel and mixed concrete will end up below the mixer mixer.
To achieve the correct ratio of each ingredient for the concrete, they have to be measured by volume; some people do this by shovel load but, unless you have experience, it is better to measure the cement and ballast (or sharp sand/gravel) by bucket loads, with a shovel you tend to get more ballast on it than cement so just counting the shovel loads can be misleading. Do not use too large a bucket as you could end up with more ingredients than the mixer can take.
Be careful that the amount of concrete you plan to mix in one go is appropriate for the size of mixer; if the volume is too small, it won't mix correctly and too large a volume could overload the machine.
- Start the mixer running with the drum pointing towards the sky at about 45° above horizontal. Once you start loading the ingredients, the mixer should be kept running until it has been emptied - if you stop a mixer with a load in the drum, it could prove hard to restart.
- Measure about half the required ballast (or half the sand and half the gravel) required and pour this into the drum.
- Add a small amount of water and allow this to mix into the ballast for a minute or two.
- Measure and add all the required cement.
- Measure and add the remaining amount of ballast/sand/gravel and allow it all to mix together for a minute or two.
- Gradually add some more water and give it a chance to mix in before adding more - watch the consistency of the mix. A good mix is smooth and flowing, not wet and runny or dry and crumbly. If some of the mix sticks to the sides of the drum and 'goes over the top', the mix is too dry; if the mix is pulled up about ¾ of the way up to the top of the drum and then drops back to the bottom, it is about right; if the drum does not lift the mix up the side, the mixture is too wet.
Note: A common problem when mixing concrete is to add too much water. Add the water in small quantities and the mixture will suddenly be the right consistency - if you think it is nearly right, just wait a minute to see what happens. Should the mixture become too wet, adding some more ballast and cement in the required proportions may soak up the excess water.
- When the mixture is OK, move a wheelbarrow into position under the drum and tip the drum to empty the concrete into it. When doing this, it makes it easier if there are two people, one to tip the drum, and one to steady the wheelbarrow.
One can then wheel the load on concrete to the job, while the other person can begin mixing the next load of concrete.
- When the job has been completed, or you want to take a break from mixing for half an hour or more, the cement mixer should be cleaned down; never leave the cleaning the mixer 'till later - the same applies to the wheelbarrow, buckets and other tools which have been used to handle the the ingredients and the mixed concrete.
Always clean the inside of the drum; put a shovel load of ballast and some water into the drum and run the mixer for 5 minutes, after this, tip the whole load out and then use a hope to wash down the inside of the drum with it pointed towards the ground. Switch off the mixer and clean any awkward areas inside the drum (i.e. behind the mixing blades etc) , using an old stiff brush.
Using ready mixed concrete
When you order Ready Mixed Concrete, you need to tell the supplier four things:
- The quantity of concrete required - i.e. the volume in cubic metres. Specify about 4% to 10% more than you have estimated using the length, width and thickness for the job. This extra concrete will allow for wastage, over-excavation, and the spreading of formwork etc.
- The formulation of concrete required - it is often easier just to tell them what you want it for - i.e. footings, garden path, driveway etc - the supplier will then just use their knowledge to select the appropriate mix.
- When you want it delivered - you may not get be able to specify a time to a half hour, you may have to accept just AM or PM of a particular day.
- The address and any possible problems with access - a narrow access road or drive entrance etc.
- It's also best to tell them how you are going to move it from the mixer to the job especially if you want to use the chute from the mixer (these usually go up to about 3 or 4 metres from the back of the lorry) - most ready mix lorries have these chutes but you don't want to find out when it arrives that this particular lorry only has a short chute
- You should also ask the supplier for their 'free cancellation time', i.e. how late can you leave it to cancel the delivery if you need to.
Ordering the ready mixed concrete is just the start, the hard work is when the concrete is delivered - the amount of concrete you ordered will arrive, hopefully, more or less when expected; all you have to do is be ready to handle it.
Things to consider for the delivery include:
- Where is the lorry going to park ? Do you need some 'No Parking' signs or speak to your neighbours to clear a parking space ? Will it obstruct a road ? Will it fit between the gate posts ? Might it sink into soft ground ?
- Are you ready for the concrete ? Have all the excavations been dug and is the formwork in place and tools to hand ?
- If the wheelbarrows will need to go across bare earth or lawns, you may want to lay down some boards for them to run over to avoid them sinking in, marking the lawn or dropping concrete on the ground.
- 'Many hands make light work' - the lorry will want to off load and be on its way as quickly as possible; so, within reason, the more wheelbarrows and people to help you you have, the better.