Replacing roof slates
Safety: When working on a roof, always use scaffolding or a suitable tower to ensure personal safety, never work from just ladders resting against the wall.
replacing a damaged slate or a slipped slate
A good quality slate roof can be expected to last longer than most other roof coverings, typically they will last over 100 years if it doesn't suffer any physical damage. However, time and weather will leave their mark on a slate roof and slates can become damaged or loose:
- Damaged slates are usually due to the roof settling, frost or wind damage, or things falling onto them (this could be pieces of nearby trees). Usually such damage will be limited to an isolated slate, or possibly to a relatively small area of the roof.
- Loose stales are more often the result of the fixing nails failing usually as they rust away (a problem known as 'nail sickness'), or the slates themselves may disintegrate around the nail holes.
When slate roofs begin to suffer from 'nail sickness' or breakdown of the actual slates, it usually indicates that the roof is approaching the age when complete re-roofing will be required. After all, all the fixing nails and all the slates will probably have been up there the same length of time so will all be suffering the same degree of ageing.
'Nail sickness' can typically be first seen by the lower edges of a row of slates being out of line - one fixing will fail on a number of slates and these will then twist.
It should be accepted that replacing a single slipped slate on a roof suffering from nail sickness can only be a temporary solution, the entire slate roof covering will need to be replaced at some time.
To replace an isolated, damaged slate
Removing a slate:
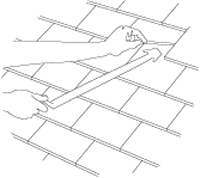
 To avoid lifting the surrounding slates too much, you will need to use a 'slate ripper' which can be pushed up between the slates to cut or pull out the fixing nails;
- Insert the ripper upwards under the damaged slate, push it up and work it around to hook one of the cutting edges behind a fixing nail.
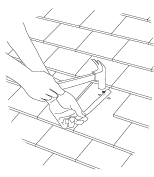
- Pull the ripper down the line of the slates in an attempt to break the nail; if just pulling the ripper doesn't break the nail, hold the lower end of the ripper away from the surface of the slates and hit down the roof with a hammer onto the front of the handle - the front of the handle normally has a flat face for this purpose.
- Repeat the above for each fixing nail until the slate is free.
- Pull the damaged slate out of the roof; it may be necessary to slightly lever up the slates around the damaged one to remove pressure from it.
Replacing a slate:
- From a thin, 25mm (1 inch) wide strip of lead or copper, make a 'tingle' to hold the replacement slate in place; the length of the tingle can be calculated by
locating the batten between the slates underneath the one removed and measuring down the roof to where the lower edge of the replacement slate will come and adding about 62mm
(2.5 inch).
 Make a hole in one end of the tingle to take a fixing nail and secure the tingle through the gap between the two slates underneath
to the batten - the fixing nail should be a short (to avoid puncturing the roofing underfelt) non-corrosive type.
 - Carefully raise the slates in the row above the tingle and push the new slate up underneath and align the lower edge with the slates to the left and right - some slates have one end chamfered, the chamfer needs to be uppermost at the lower end. When pushing the replacement slate up the roof, keep it in line with the roof slope as much as possible; the top end of the new slate needs to go over the first batten and rest on top of the next batten up - for guidance, see this illustration.
- Having pushed the new slate into position, bend the lower end of the tingle around the lower edge of the slate and down onto the front of the slate. the tingle will hold the slate in place by stopping it slipping.
To replace an isolated slipped slate
- If the slate has twisted rather than completely slipped down the roof, this indicated that only one fixing has failed; so the first thing to do is to use a slate ripper to cut or pull out the remaining nail as described above to free the slate.
- Examine the fixing holes in the slate:
- If the slate has started to flake away and thin around any of the holes, this could mean that this particular slate is weak and that wind etc over the years has resulted in the nail rubbing against the slate. This may indicate that the problem is not 'nail sickness', but where you have one 'flaky' slate, you'll probably find more.
- If the slate around the holes doesn't show any significant signs of wear, it probably indicates that the nail failed, not the slate - i.e. 'nail sickness'.
- Replace the slate using a tingle as described above.
