

This article has been submitted by wardrobedoorsdirect.co.uk
How To Create A Pocket For A Pocket Sliding Door
This guide is written on the assumption that you will be creating a pocket for a full-height* single sliding door from scratch and that the pocket stud wall is to be constructed at 90 degrees from an existing wall.
For the construction of stud walls that are to accommodate single pocket double sliding doors on two tracks, or walls with two pockets to accommodate two or more doors on two tracks (see diagrams), a similar method can be followed, making suitable allowances for the different configurations.
This guide also assumes that the pre-planning stage is already complete.
* A full-height door is defined here as a door that is the full-height of the room (i.e. from floor to ceiling); if you are planning to install a pocket sliding door that is less than the full height of the room the end face of the wall above the pocket will need to be covered with plasterboard, or trimmed with suitable timber facing. For double pocket sliding door installations where the doors are not full-height, the stud wall framework will continue across the top of the opening and will need to be covered with plasterboard.
Tools required:
Hammer, Chop Saw (if preferable), Jigsaw (if preferable), Hand Saw, Screw Driver, Hammer Drill (if fixing to brick/blockwork), Set Square, Spirit Level, Tape Measure, Pencil, Plumb Line, Plastering Float.
Materials required:
Rough sawn timber (100mm x 50mm profile); 100mm Nails; Screws (at least 70mm length); Wall Plugs (if fixing to brick/blockwork); Plasterboard; Plasterboard Screws; Packers; Plasterboard Tape; Plaster.
Before starting:
In order to decide the best position to locate the stud wall it is advisable to check first on the position and direction of the ceiling joists, so that the ceiling or head plate for the stud wall can be fixed securely.
If the stud wall is to be constructed in a ground floor room you will need to lift any floor coverings and a couple of floorboards in the room above to check the position of the ceiling joists. If the stud wall is to be constructed in a first floor room then the joists can be located by accessing the loft space.
At the same time you are checking the joists make note of any electrical cables or pipework that could be in the way of fixing the stud wall.
Method:
Perhaps the simplest way to create a pocket door installation is to visualise it as two stud walls, parallel to each other, with the top and bottom pocket door track and the door itself ‘sandwiched’ between them.
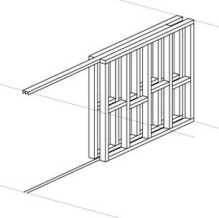 Stud walling is usually created using lengths of 100mm x 50mm timber which works well when insetting door carcasses. In the case of pocket sliding doors, smaller section timbers (eg 50mm x 50mm) can be used if preferred to create a slimmer stud wall.
The basic construction process can be simplified as follows:
- Construction of the first side of the stud wall.
- Installation of the top and bottom tracks and the door(s).
- Construction of the second side of the stud wall, enclosing the sliding door.
- Plastering and decoration.
Let's go through each point, step by step:
1. Construction of the first side of the stud wall
 Once you have created a plan for the pocket door installation and decided on the location for the stud wall (see ‘Before starting’ above), clearly mark the relevant measurements on to the floor and wall. Use a spirit level to ensure the finished stud wall is vertical. If any skirting board or ceiling coving is present, sections of this should be removed prior to the installation of the stud wall. Lift any floor coverings such as carpets and underlay to reveal the floorboards or solid flooring.
Floor / base plate
The first piece of timber to fix is the floor or base plate. Check that the timber is not bent or warped as this will affect the final alignment of the stud wall.
Measure and cut a section of timber to the length that the stud wall will project out from the existing wall. If you intend to face the edge that the door will slide into with wood and / or plasterboard please bear this in mind when calculating the length the base plate needs to be.
Use a set square to ensure that the angle between the base plate and the existing wall is 90 degrees.
Ensure that it is perfectly level using a spirit level and screw the base plate to the floor using suitable fixings. Use packers if necessary to achieve the level. If the flooring material is floorboards use fixings that will go through the 50mm timber and the floorboards e.g. 70mm screws. Once you have secured the base plate you can then move on to the ceiling.
TIP: Double Pocket Doors If you are creating a double pocket door in the mid section of the stud wall (i.e. with doors sliding into pockets on each side of the opening) then run the base plate the full width of the room. After it has been fixed to the floor and the ceiling plate and trimmer studs added (see below), cut out the section where the eventual door opening will be. This will ensure that the stud walling is built in the same plane on both sides of the opening.
Ceiling / head plate
Transfer the position of the base plate on to the ceiling using a spirit level held vertically against a suitable length of timber and mark clearly. Once you have an outline of the base plate transferred to the ceiling measure and cut the ceiling plate timber and screw this to the ceiling, first ensuring there are no electrical cables or pipes in the way. Again, if you are creating a full-height double pocket door in the mid section of the stud wall (i.e. with doors sliding into pockets on each side of the opening) then also run the ceiling plate the full width of the room. When the uprights have been secured either side of the opening, you can then remove the central section from the ceiling plate.
TIP: It is advisable to first check the position of the ceiling joists and the direction in which they run - see the section Before starting above.
Wall studs
With the floor and ceiling plates in position measure up for the wall studs at each end of the framework.
Measure from the top of the base plate to the underside of the ceiling plate and cut the timbers to length.
Fix the wall stud to the existing wall using suitable fixings and ensure that it is exactly vertical using a spirit level. Secure the other upright (trimmer stud) at the other end of the framework where the door will slide into.
Once the initial framework is completed insert additional upright studs equally within the frame. If you are using 9.5mm plasterboard, the centres between studs should be 400mm (maximum); for 12.5mm plasterboard, fix the studs at 600mm centres (maximum). Fix the upright studs to the floor and ceiling plates using skew nailing.
TIP: Double Pocket Sliding Doors If you are constructing two sliding door pockets (one on each side of he opening) ensure that the end uprights (trimmer studs) either side of the opening are fixed in place prior to cutting away the section of base plate and (if you are installing full-height pocket doors) the ceiling plate.
Noggins
In-between the uprights noggins should then be inserted about half way up, to provide cross bracing. To make nailing through to the uprights easier, stagger the position of the noggins across the width of the stud wall - see diagram.
TIP: If you intend to fix skirting boards to the base of the stud wall, cut some extra noggins and fix these to the top of the base plate, between the upright studs - this will provide an additional point of contact to fix skirting boards to.
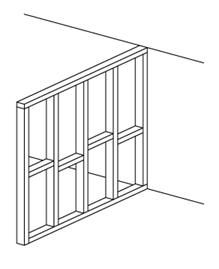
Plasterboarding
With the first stud wall framework in place the outer surface can now have plasterboard applied.
2. Installation of the top and bottom tracks and the door(s)
Once the first side of the stud wall is completed the top and bottom tracks can be installed. If your pocket sliding doors come with an installation guide, refer to the instructions for fixing these to floor and ceiling. The installation guide supplied by Wardrobe Doors Direct is comprehensive and easy to follow written in plain English.
In the case of a single pocket sliding door installation, the door itself should also be fitted into the tracks at this stage.
The end face of the stud wall framework, where the sliding door will be housed when slid back, can be covered with plasterboard or planed timber as desired. Architrave can be added at a later stage to neaten up any edges.
TIP: If the tracks for the sliding door don’t reach the existing end wall, fix a stop plate or buffer to prevent the door coming off the tracks when inside the cavity. Fix this in place at the same time as the top and bottom tracks are installed.
You can read more about installing pocket doors with top and bottom tracks, including more tips, in the Wardrobe Doors Direct article Pocket Sliding Doors.
3. Construction of the second side of the stud wall, enclosing the sliding door
Once the door is in position repeat the process described in (1) to create the second stud wall.
TIP: If the stud wall is wider than the door it conceals, add some additional cross noggins between the two frameworks to tie the two stud walls together. Do this prior to plaster boarding over the framework of the second stud wall.
4. Plastering and decoration
Please refer to these articles on:
- How to cut the plasterboard
- How to join two ends of plasterboard together
- How to plaster over plasterboard
Architrave and skirting boards
To provide a neat finish to the opening around the newly created pocket door architrave can be added and skirting boards fixed at floor level to match the rest of your room.
This guide was produced by Wardrobe Doors Direct where you can buy Sliding Pocket Doors suited to this installation. Follow the guide and you should end up with a professionally finished divide between two spaces.