
Repairing plaster on masonry walls
preparing the wall - applying the first coat - applying the finishing coat
Small repairs to cracks and chips in plaster are dealt with in our article "Repairing small damaged areas in plaster", dealing with larger areas where plaster has become detached from the masonry is covered by the article below. The same basic technique is used after any bricks or blocks have been replaced.
Preparing the wall
Begin by removing all loose plaster back to the masonry, loose plaster may extend beyond the immediate area of any detached plaster - if the wall sounds hollow when the plaster is lightly tapped, this probably indicates that the plaster has become become detached from the masonry even though it still looks OK.
Wearing goggles, gloves and a face mask, use a small cold chisel and hammer to remove any areas of plaster which sound hollow - hold the chisel at an angle towards the wall. don't hold the chisel parallel to the wall where the plaster meets the masonry, this may just lift off perfectly sound plaster.
Cut the edges of the hole back so that they are as square to the masonry as possible - getting a good finish where the new plaster tapers onto the original is difficult.
Once the loose plaster has been removed, use a small cold chisel to remove any plaster left on the face of the masonry and to remove the mortar from between the bricks/blocks to a depth of 5 to 7mm - be careful if the original mortar between the bricks/blocks is lime based, this may be very soft and scrapping along the joints with a cold chisel or old screwdriver should be all that is necessary. Especially where the original mortar was lime based, clean the mortar from the sides of the joints so that the brick/block surface is fairly clean - this gives the new plaster something firm to adhere to.
The first coat (the undercoat aka 'Browning')
 Just before applying the first coat, dampen the masonry and the edges of the existing plaster by flicking a brush wetted with clean water or use a light spray of clean water - the existing masonry and plaster should be damp but not running with water when the first coating is applied.
Prepare some Undercoat/Browning Plaster in a clean plastic bucket using clean water, follow the manufacturer's instructions to obtain the required consistency.
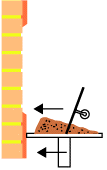
Place some of the mixture onto a clean builder's hawk. Holding the hawk against the wall under the area to be plastered (see right), use a steel float to push a quantity of undercoat plaster onto the masonry and then up the wall.
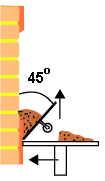 Start moving the float up the wall at about 45° to it and as you move the float up, reduce the angle to about 30°; push the plaster onto the masonry and move the float up the wall in one movement.
 You will probably not cover all the exposed masonry with one float load of plaster, when the plaster on the float has been spread, move the float 'up and away' to remove it.
 Reload the float with plaster from the hawk and apply more undercoat to the masonry - repeat this until the whole of the exposed masonry has been covered.
Each coating of Undercoat Plaster should not be more than 10mm thick, at the same time the final level needs to be about 1mm below the level of the surrounding plaster - how this is achieved will depend very much on the thickness of the original plaster, one coat of Undercoat Plaster may be sufficient or, with thick original plaster, two or more coats may be required to build-up the thickness.
If more than one coat of Undercoat is required:
- Roughen the surface of the coating before it hardens - either score the surface with a crisscross pattern using the point of a trowel or use a scratching float (a wooden float through which nails have been driven so that the points stick through the bottom - not worth obtaining unless you plan to do a lot of plaster work).
- Leave each coating to dry off for a couple of hours, then wet the area (flicking water from a brush or using a spray) and apply the next coating using the steel float to apply the Undercoat Plaster to the masonry from the hawk in the same manner as the first coating.
- Try to apply all the coats of Undercoat in the same day, this should ensure good adhesion between each coating.
When the first Undercoat layer has been built up to the appropriate thickness (i.e. about 1mm below the surrounding plaster), put a straightedge across the repaired area and make sure that there is a gap of about 1mm for the finishing coat. Use a wooden float to finish off the Undercoat coating to obtain a flat but slightly rough surface.
The finishing coat
Get the smooth finish on the finishing coat is important and more care is needed, but the way to apply it is basically the same as applying the undercoat coat.
Prepare some Finishing Plaster in accordance with the manufacturer's instructions and load some onto the clean hawk.
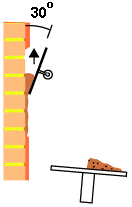
Holding the hawk against the wall, use a steel float to push a small amount of the finishing plaster onto the undercoat and push it up and across holding the float at about 30° to the wall, move quite quickly to give a thin coating.
Repeat this until the whole area of the repair has been covered and the finishing coating built up to the level of the surrounding plaster.
Smooth the surface using the flat of a clean steel float. Begin at the bottom left (if you are right handed - if you are left handed, begin at the bottom right and move the float in an arc to the left) and move the float in an arc to the right. Slide the float off of the plaster and repeat this starting on the left but a little bit higher. Make sure to hold the float with the leading edge in the direction of the arc and apply a little pressure to the trailing edge as you move it through the arc.
If the finishing coat begins to dry out while you are still smoothing it, dip the float into some clean cold water before continuing.
When the whole area has been smoothed off, check for high points and hollows by looking along the surface - don't place a straightedge across the face of the wall as this will mark the surface of the finishing coat which will just lead to more smoothing out. Reduce high points by re-smoothing with the float dipped in water, apply pressure as you move the float over the high points; fill hollows using some more mixed finishing plaster, and smooth off using the steel float,