
Kitchen design - planning
basic kitchen layouts - planning the kitchen layout
This article is intended to guide you through planning the layout, the advice given is only for general guidance, not all of it will be practical in all situations and compromises will often have to be made.
A good general rule is to keep it simple - and remember why you are doing it.
If you are fitting a kitchen in your home, you can be quite personal in your decisions, but if you are fitting a kitchen in a property to sell or rent, bear in mind your target market and don't let your personal preferences get the upper hand.
Planning the layout of a kitchen can be broken down into three simple steps:
- Measure the overall space available and note the existing position of the doors, windows, and services (gas, electricity, water, drains, extractor etc).
- Working out an arrangement to fit the work tops, cupboards and appliances where you want them.
- Determine what changes are required to the services (gas, electricity, water, drains) to suit the layout you've drawn up.
The basic kitchen layouts
Kitchens are generally divided into 3 activity areas:
- Preparation of food;
- Cooking and serving;
- Washing up.
Each of these areas need to include the working surface and the appliances appropriate for the activity; in addition each area will need storage space for the ingredient, utensils, equipment etc required.
The three areas need to be arranged so that the work surfaces and appliances are in order i.e. work surface - appliance - work surface. The three areas form a work triangle (as used in the diagrams below) which reflect moving from one area to another. For the greatest efficiency the total length of the three sides of the triangle should be between 3.6m and 6.6m, and as far as possible, the work triangle should not cross the route of any through traffic.
Most kitchen plans will be one of four basic layouts:
- The galley layout.
- The 'L' layout.
- The 'U' layout.
- The Island layout.
These 4 layouts are described in more detail below.
1. Galley layout.
The galley layout is possibly the only option where the kitchen has to be in a long, narrow room. You are basically restricted to having storage units and appliances along the two walls with work surfaces. There should be at least 1.2m between the opposite rows of units/appliances to allow access to front loading appliances. In really narrow areas, the units/appliances may need to be restricted to just one side to provide sufficient room for working.
The galley layout could alternatively be used across the end of a room, with a work surface separating it from the rest of the room.
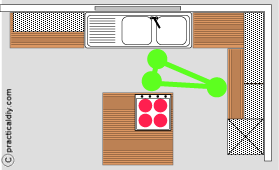
2. 'L' layout.
The 'L' layout is ideal for building a kitchen into the corner of a room, such as a kitchen/diner.
3. 'U' layout.
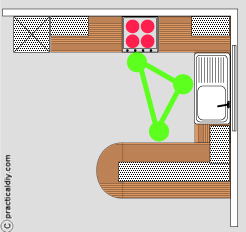
The 'U' layout is similar to the 'L' layout but with an additional working surface projecting from one end. There should be at least 1.2mm between the parallel sides of the U to allow sufficient working room and access to front loading appliances. The working areas are all within easy reach of one another and are closer together than an 'L' layout. In a kitchen/diner, it does have the advantage that there is more of a definite divide between the two area.
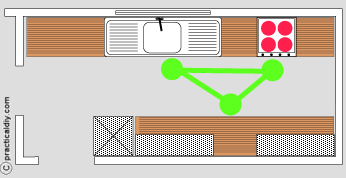
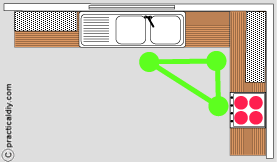
4. Island layout.
Sometimes an Island layout is considered as a bit of a luxury, but it does have advantages in fairly large rooms as it locates everything fairly close together - it is actually very similar to old 'grand' kitchens where there was a large kitchen table in the centre of the room. There should be at least 1.2m between the island and cupboards/appliances on the outside walls.
While the illustration above shows a cooking hob on the island, the island could be used as a food preparation, or even the washing area but remember that any services required will need to be routed to the Island which may involve quite a lot of work.
Planning the layout
- Start by measuring the kitchen at both floor level and at about 90cm above the floor - use the smaller of these measurement for your floor plan.
- Draw a scale floor plan, use squared paper to make it easier.
- Mark the existing position of the services (hot and cold water, drains, electric points, gas points, extractor fans in the walls/ceiling etc) on the plan.
- Make a list of all the floor and wall mounted appliances you want to have in the kitchen - the usual ones you might want to consider include:
- Cooker or Hob and Oven
- Extractor hood for cooker/hob
- Fridge and/or freezer
- Washing machine
- Tumble dryer
- Dish washer
- Extractor fan
- Waste disposal unit
- You can either work in pencil (and rub units out the markings when you change positions) or make scale template for each appliance and sink from paper or card. Mark the name of each appliance on relevant template.
- Remember that kitchens need three work areas - preparation, cooking and washing-up - and each of these areas need to include all the appropriate appliances together with a suitable sized working surface.
- Roughly position on the plan each appliances in their most logical position in relation to the existing position of the services. Do not worry at this stage if more services are required, this just shows that you will need to add more. Often the first unit to locate is the sink, traditionally this goes under a window - but there is no reason why this should be there if somewhere else is more suitable.
- Look on the plan at the free area between the appliances and decide how many base units you can or need to fit. If using paper or card templates, cut out some more templates for for these units - units are usually available as 300, 400, 500 and 600mm widths.
- Decide if you want any tall cupboard - these can provide added storage.
- Draw (or locate the templates) of base units on your plan.
- Consider the amount of work surface around each work area - is it enough ? - appliances are often sized to fit under work surfaces. Avoid having work surfaces that are less than 1 metre in length - they are not very practical.
- If you cannot arrange all the appliances or base units you want on the plan, or if you think the kitchen area is already too full, consider if any appliance can be relocated in to another room - i.e. move the washing machine or freezer to the garage.
- Think how the appliances/work surfaces can be rearranged to make the kitchen easier to use; begin to consider relocating the position of the existing services. Remember that you will need electrical points, probably on the walls, for the moveable appliances (those which you store in cupboards when not in use) as well as electrical power for the floor mounted appliances.
Remember that services and window/doors can always be added or repositioned to suit your plan - it will just be extra work. This is a rough order of difficulty (and probably also cost) of likely changes :-- Moving/adding electricity, (easiest, cheapest)
- Moving/adding gas,
- Moving/adding water supplies,
- Moving/adding drains (above floor),
- Blocking up doors/windows,
- Moving/adding drains below floor
- Moving/adding doors/windows, (most difficult, expensive)
- Bear this in mind and try different layouts of appliances/unit on the floor plan to achieve your dream kitchen - then consider what changes to the services would be required - are you happy with the amount of work involved? In the end, you well have to compromise.
- When you are satisfied with the position of the appliance and units on the floor plan, you can now consider the wall areas and where wall units will fit, these tend to be most needed in the food preparation area. Try and keep wall units inline with, and the same width as, the base units immediately below them.
- When you have finished the plan, you are now ready to list:
- The number and width of floor units required - although you will still need to decide of the style.
- The number and width of wall units required.
- The appliances to be fitted.
- Any addition or repositioning of the services.