Painting wooden flush doors
Prepare wooden flush doors for painting in accordance with our "Preparing wooden doors and windows for painting" page.
The following applies when applying Primer, Undercoat and Topcoat (or a single coat paint). Before applying a second and subsequent coats, lightly rub down the previous coat using a fine glass paper (at least 240 grade) to smooth the surface - do not rub so hard that the wood surface is exposed.
Removing the door furniture (handle, key hole etc) before painting can make the job of painting the door easier - if they are left on the door, take care when painting around them when the appropriate area is being painted.
 Painting a flush door
can seem a big job as there is such a large area and the finish needs to be smooth and without visible joins. The secret to a good
finish is to apply the paint quickly so that the edges of paint blended into the adjacent area when it painted, this will ensure
that is no visible join.
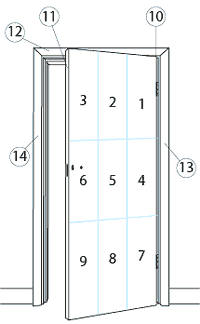
Before you begin to paint a flush door, look at the face of the door and divide up in your mind into a 9 areas - 3 across and 3 down- as shown to the right.
Use a fairly large paint brush ( 60 - 75mm (2½ - 3 inches)), and starting at the top, hinge side, paint the first area on the room side of the door - start with vertical brush strokes, then (without reloading the brush) spread the paint using horizontal strokes, and finish with light, upward strokes.
Then move on and paint the second area, blending in the paint with the edge of the previous area.
When painting the areas down the edges of the door (i.e. 1,3,4,6,7,9 on the illustration), allow the paint brush to turn the corner and lightly brush on to the edge of the door. Leave the top of the door unpainted unless it will be visible from above (such as from a staircase).
Paint the remaining areas on the first side of the door in sequence and using a similar method of spreading the paint - make sure that the previously coated areas are blended in to prevent and visible joins. Be consistent with the amount of paint applied to each area and with the direction of the finishing brush stokes.
Having completed the first side of the door, paint the other side using the same procedure.
When both sides of the door have been painted, use a small paint brush (25mm (1 inch)), and carefully paint the edges of the door finishing with vertical strokes, start by painting the edge on the hinge side of the door and then the lock edge - make sure that paint is not applied 'around the corners' onto the completed sides.
If the door frame is to be painted at the same time as the door (preferably this should be painted at the same time as the skirting board, rather than the door), start by painting the frame above the door, then down the hinge side and finish off by painting down the frame at the lock side of the door. Use a small brush (25mm (1 inch)), and make the finishing strokes in the direct of the wood grain (i.e. vertically on the sides, horizontal above the door).
If the door furniture had been removed from the door before painting, leave the paint on the finished door to harden before refitting the handle etc.
