
Painting wooden sash windows
Before starting to paint wooden sash windows, the wood needs to be prepared as outlined our "Preparing wooden doors and windows for painting" article.
The steps explained below apply when applying each coat of paint, i.e. the primer, undercoat and topcoat (or a combination under/top coat).
After the Primer or Undercoat has been applied, the paint needs to be lightly rubbed down with a fine sandpaper (at least 240 grade) to remove surface dust etc without exposing wood underneath.
Painting a sash window may seem to be awkward there are various small areas to paint and the two sashes obstruct each other. The secret is the sequence of painting and moving the sashes.
The steps outlined below refer to painting the interior sides of the sashes, painting the outer surfaces is similar but is best left to do after the inner paint has dried - alternatively, the outer surfaces can be done first, and the inner surfaces done later.
With sash windows there are a lot of timber to glass edges, if you find it hard to paint a neat edge along these edges (note that Primer and Undercoat should not go onto the glass,
Topcoat should lap onto the glass by a about 1 or 2 mm), the edges of the glass can be protected by putting masking tape on it.
The masking tape should be firmly pressed onto the glass to avoid the paint creeping underneath and the tape should be removed before the paint has fully dried to avoid the tape possibly lifting the paint).
An alternative method to keep the paint off of the glass is to hold hold a 'shield' against the glass as you point along it - DIY stores often stock such a device but a 'homemade' shield made from a piece of stiffish plastic will do the job just as well; you could use a piece of card but this is need to be replaced fairly frequently as it becomes sodden with paint, you can just wipe the paint on a plastic shield. If you do get some paint on the glass, leave it to try and then scrap it off.
The painting sequence
 Start by raising the bottom (inner) sash, and lower the upper (outer) sash, this will expose the inner surface at least the lower half of the outer sash below the inner sash.
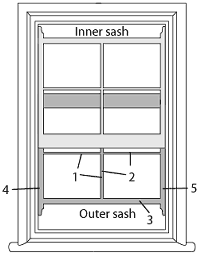
Start by using a small (12 to 25mm (½ - 1 inch)) paint brush to paint the accessible parts of the outer sash - begin with the glazing bars (1 and 2), then the lower cross bar (3) and then the accessible areas of the side rails (4 and 5). As these areas tend to be fairly small, do not pick up very much paint on to the brush and brush it out fairly well.
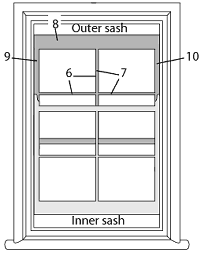 Lower the bottom (inner) sash, and raise the upper (outer) sash taking care to only handle the unpainted cross member of the upper sash - to expose the unpainted top half of the upper sash above the lower sash. Complete the painting of the upper sash - by painting the unpainted glazing bars (6 and 7). then the upper cross bar (8) and the the two side rails (9 and 10) - where these areas join previously painted areas, apply the paint onto the previous painted areas and brush it out so that the blends together.
The upper/outer sash has now been painted on one side.
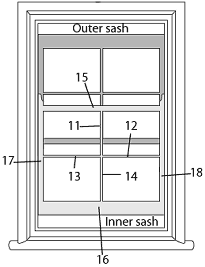 The side of the lower (inner) sash is fully exposed so painting it is straight forward, it may be necessary to move the lower sash up slightly to make the bottom of the sash accessible for painting. Begin by painting the glazing bars (11 to 14), then the upper cross bar (15) followed by the lower cross bar (16) and finish off by painting the side rails (17 and 18).
The sashes should be left open (i.e. not fully pushed up or down) until the paint has dried.
The surround to the sashes should be painted after the paint on the sashes has been allowed to dry. Close the sashes and paint the exposed areas of the side runners, do not paint the pulleys or cords. Paint the sill should be left to last and lift the inner sash to give access to the sill.
Paint the remaining areas of the frame around the sashes working outwards.